I mentioned the 20% thing, and my response. While I was holed up under my desk, I took some time to read up on current medical literature to figure out how that 20% was derived. By the way, morbidity is a fancy word for occurence. No one died.

Once you get the headache, the dura needs to heal so the CSF will stop leaking and the headache will stop. Roughly 24% of PDPHs clear up in 1-2 days, another 29% in 3-4 days, and another 19% in 5-7 days. By two weeks, a total of 80% of PDPHs have resolved themselves.

In any population, there are people who have issues and people who don’t. Over the whole population, you can get a general risk factor. But.. certain parts of the population are probably going to be more at risk that others. In my case, I hit the jackpot.

There are three significant studies of the morbidity of PDPH in dural puncture patients. The earliest and most quoted is from the late 1950s, and already a disturbing trend was evolving: there’s something about Mary, and it’s not her hairdo. After controlling for the possibility that women are simply over-reported (due to punctures during attempted epidurals on the delivery table), it was becoming clear even back then that being female is a clear risk for PDPH. Being female raises the risk to close to 40%, effectively doubling it. The two later studies looked at other physical factors, such as weight, physical health, physical fitness, and age. Again, the studies were controlled for the potential over-reporting of females of childbearing age, but an even scarier, and more complete, picture emerged: physically active females with lower body mass indices and age from 18 to 40 years old were shown to have a morbidity rate of 70%. Interestingly, being obese and having high blood pressure cuts the risk to nearly zero. There you have it, donuts are your friend.

It turns out that those of us who love our yoga, our running, our daily attack on fat molecules, also maintain very healthy and flexible tendon and ligament tissue. The dura is just one big ligamentous envelope. One big slow-to-heal ligamentous envelope. Healthy ligaments are stretchy and under some tension, so the small tear that the needle makes pulls open. Less healthy ligaments don’t stretch, they just kind of sag there, so the sides of the tear do not pull apart at all. The pulled-apart opening takes longer to heal, because the little ligament fibres have to reach the other side to join up and patch themselves together. Curse the situps and the sun salutations!

Ouch. That would be me, right there, physically fit skinny chick. Had I known about the 70%, I still would have gone through with the puncture, but I think I would have been less surprised  by the onset of what turned out to be the most miserable week of my life so far. I would have been more prepared for the disruption. I might have even taken the pain more seriously when it started and just laid down. But I didn’t, and I didn’t. Ouch.

The release form is rather vague. The doctor is often vague. “About 20% of the people get the headache.” Ok, so, for a healthy, physically active female, this should be nothing. No risk. Um, yeah.

At a time ranging between 12 and 48 hours after the dural puncture (the dura is the membrane that covers the brain and spinal cord), a certain group of people experience a pressure drop in the cranial cavity due to leaking cerebral-spinal fluid (CSF). This pressure drop can be very small or very large, but in all cases, it is very painful. Not that the brain feels pain (it doesn’t), but the tissues surrounding it, and even the skull itself do. Nerved and blood vessels get crunched under the weight of the brain, which is no longer floating in a nice CSF bath. In fact, if care is not taken, you can get a nice concussion going. Yuck.

For me, the onset of the PDPH was about 22 hours after the puncture. I was driving to work when I noticed that my neck was becoming increasingly stiff and painful. That was my brain, snugging up to the rear cranial shelf, crimping some veins while it was at it. A quick check of the internet when I got to work revealed that yup, I had a PDPH. Ok…..

When I signed the form, my doctor was careful to tell me that there was no real cure for a PDPH except time. Pain pills don’t work. The only thing that works is lying down, to equalize pressure throughout the spinal and cranial cavities. You can take a bit of the edge off with caffiene and its wonderful vasoconstricting properties, but you cannot stand or sit up.

I spent the day with my laptop on the floor and my head between my knees. I kept this up for another two days, managing by keeping my head down, taking a small amount of acetaminophen, and a large amount of tea. Most interestingly, I could drink coffee. Normally, coffee makes me sick. Too much caffiene is too much stimulation for my poor little self. But in the throes of this mess, it was nothing. Not a single cell was jittered.

Wow.

For those who don’t get the joke (seemingly everyone I know), the title refers to a line in the movie Spinal Tap, in which lead guitarist Nigel Tufnel informs journalist Marti DiBergi that his Marshall amplifier head is “one louder” because the volume knob is numbered from one to eleven, instead of one to ten like a regular production model.

There you have it. I have now had a spinal tap. Also known as a lumbar or dural puncture, it’s a test used to identify issues involving cerebral-spinal fluid, the stuff that keeps your brain afloat in your head and prevents concussions from occuring when you move your head around. The actual spinal tap procedure is not particularly painful. If you’re me, it doesn’t really hurt at all. Removing the needle is more painful than inserting it. Et cetera. If you don’t mind, I’ll keep the reasons for the test private. The results were  completely negative, which should suffice.

All of this is not sounding especially exciting, is it? Certainly not enough for a blog post from this somewhat reluctant blogger. You are correct, so far, the whole spinal tap thing is, frankly, another boring medical procedure that people occasionally have to undergo. You go to the doctor’s office, sign some forms, and get poked in the back. Typically using 22g Quincke needle, between L4 and L5. About 5ml of fluid is removed, you lay down and rest for a little bit and then you go your merry way.

My neurologist, a rather studied dude who carefully answered my questions about the procedure, was rather business-like throughout the whole affair. The actual puncture is a very routine procedure, one done by neurologists  on a very regular basis. It is the full Monty, while the more common epidural insertion is the specialty of anesthesiologists. In an epidural, care is taken to avoid a dural puncture, because firstly, it’s not necessary, and secondly, well, it can cause issues.

The issue in question here is called the Post-Dural-Puncture Headache. It’s why you have to sign that release form before the test.

The 11mm Brembo master cylinder fitted to the rear braking system on many Aprilia, BMW, and KTM motorcycles is a weak point, to put it mildly. Regardless, it is fixable. See below for how and why.

0. Tools required
Inside circlip pliers
10mm socket
5mm hex drive
2mm long drift (10cm) or 2mm Allen wrench
Tack hammer
Long-nose pliers
Flat-head screwdriver
Dental picks
Dremel with small round cutting bit
One full rebuild kit from Brembo, part number 110.4362.41

1. Remove the master cylinder from the bike. To do this, remove the bolt holding the brake fluid reservoir and washer with a 10mm socket. Return the bolt and washer to the hole to insure they are not lost. Drain the reservoir and replace the lid and gasket. Release the brake line fitting from the top of the master cylinder and back it out entirely. Remove the two bolts securing the MC to the bike using a 5mm hex drive. Lift the MC away from the bike, clearing the brake line at the top. The push rod will slide out of the rubber boot at the bottom with a slight tug. Return the two hex screws to the bike for safekeeping.

2. Retire to somewhere warm (or cool…), you might be there for a while. Bring the MC with you. Spread some paper towels or other protection out, and drain the master cylinder fully. Set aside the rebuild kit for later.
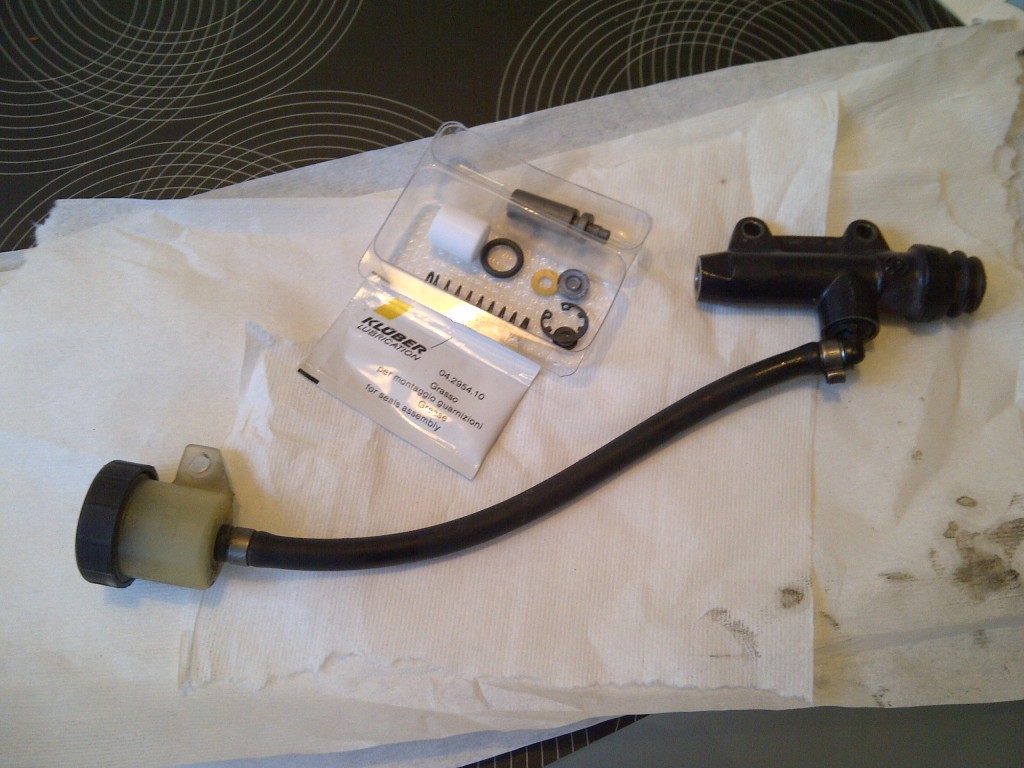
IMG-20130113-00182

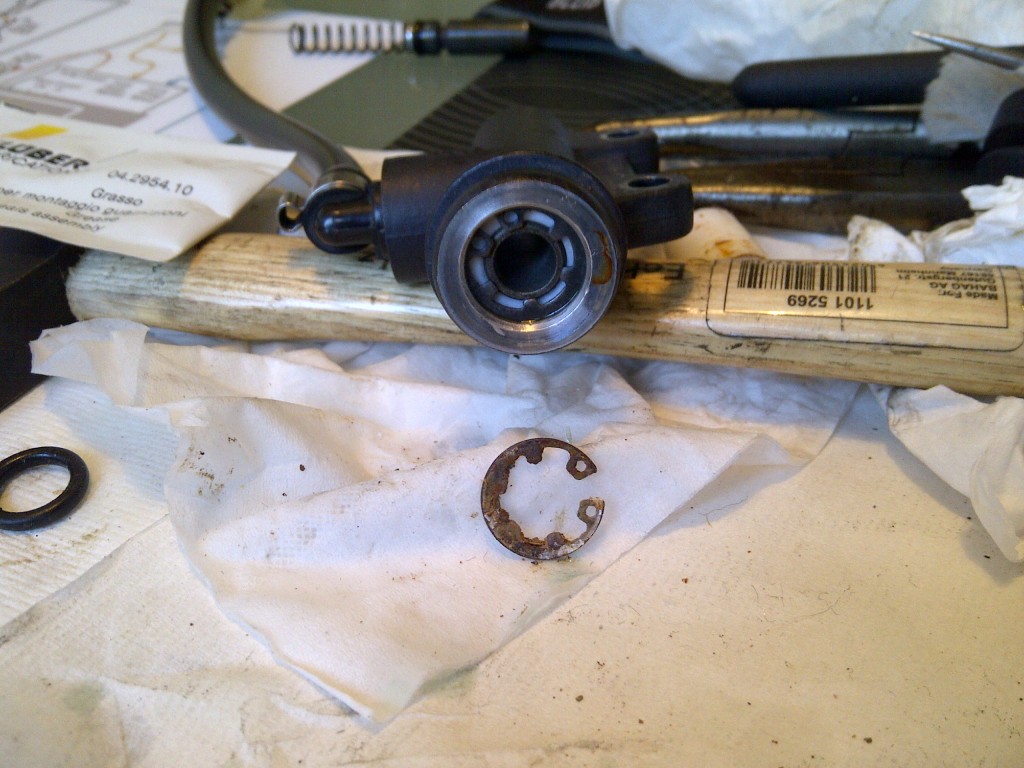
3. Carefully examine the MC. Remove the rubber boot by tugging at it gently. To help it, insert a flat screwdriver into the groove at the base of the MC and gently prise the boot away. Looking down the bore of the MC, you will see the piston at the center, a white spacer surrounding the piston, and a circlip holding it all together. The circlip may be rusty, if it is, you have some work on your hands. See below for a good (bad) example of a rusty circlip.
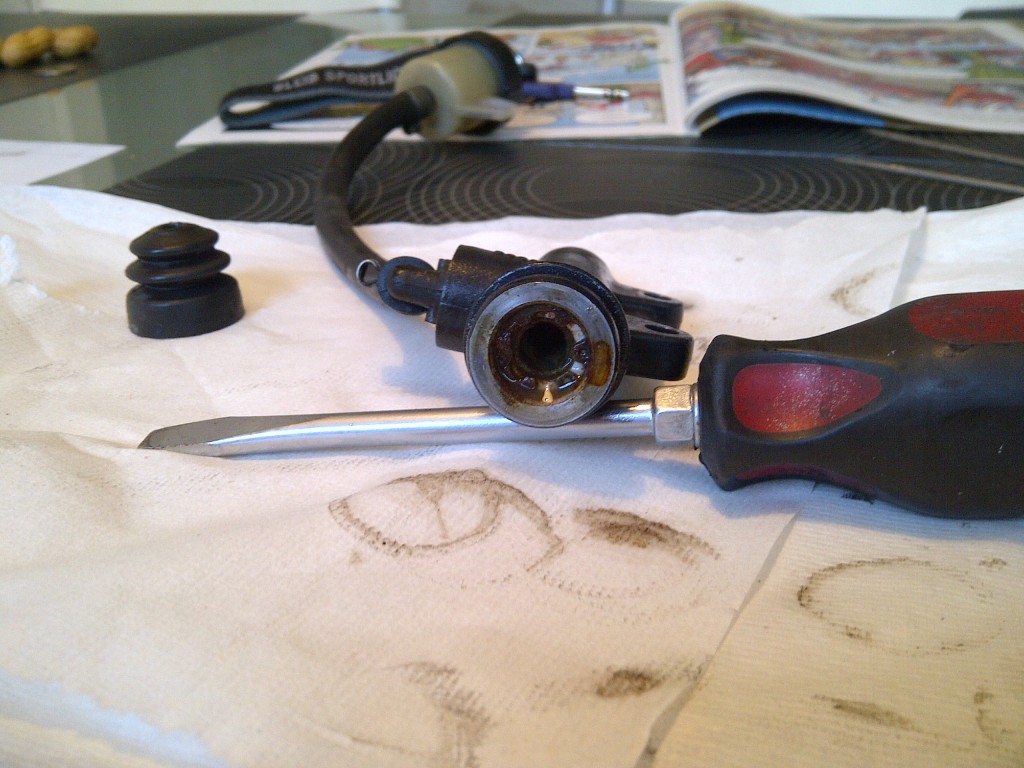
IMG-20130113-00184

4. Remove the circlip using inside ring removing pliers. If the piston is stuck, use a long 2mm drift or a 2mm Allen wrench to drive it out from the top side. Tap the drift or the Allen key gently with a tack hammer, checking the other end for progress occasionally. When approximately 4mm of piston are exposed, gently grab the piston with long nose pliers and slide it out. This will all require some effort. The spring and spring seat will also come out at this time, or can be shaken out gently. Examine the piston for corrosion and clean it.
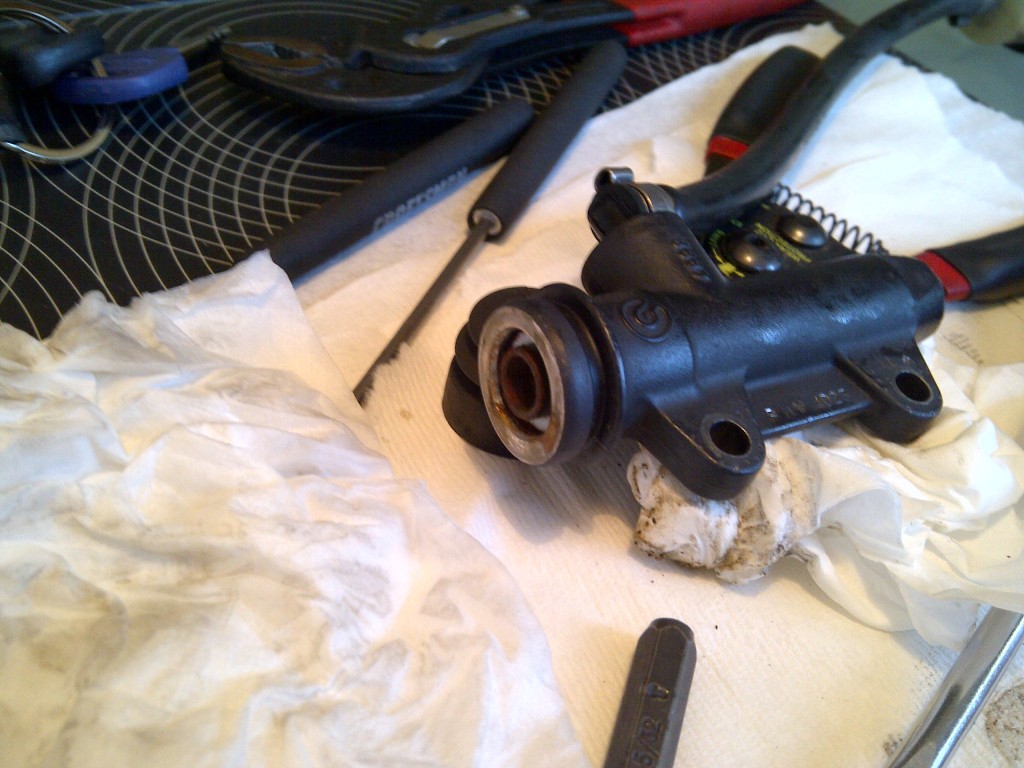
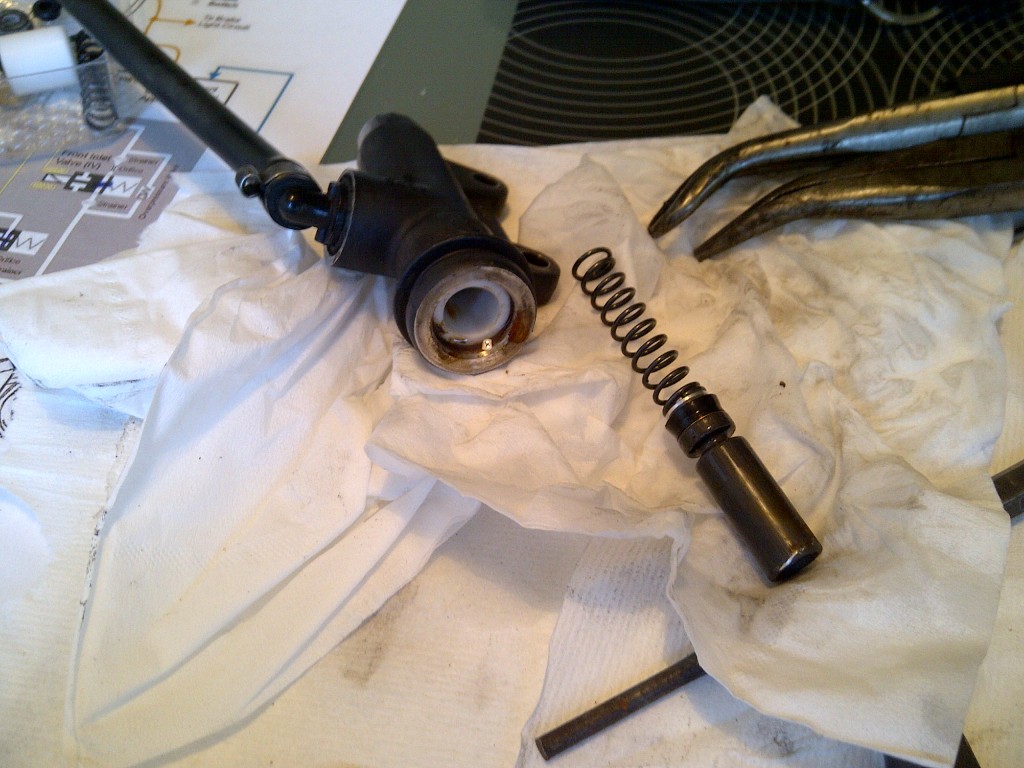
IMG-20130113-00185

IMG-20130113-00187

5. Now for the fun. The white sleeve may not slide out willingly. If it did, you would not likely be attempting this repair. A rather easy way to remove the sleeve is to grind or cut a groove in it. I used a 2mm ball-shaped cutting bit on my Dremel and ground out two channels, one the full length of the sleeve. Using the circlip pliers, twist the sleeve in the MC body and slowly work it out. Another way to remove the sleeve is to turn the bits of a 90° circlip tool to the outside and use it as a puller. In either case, take care not to damage the surface of the bore. It is not a sealing surface, but smooth is very important to the cylinder staying functional for any length of time. After removing the white sleeve, remove the o-ring that is still in the bore.
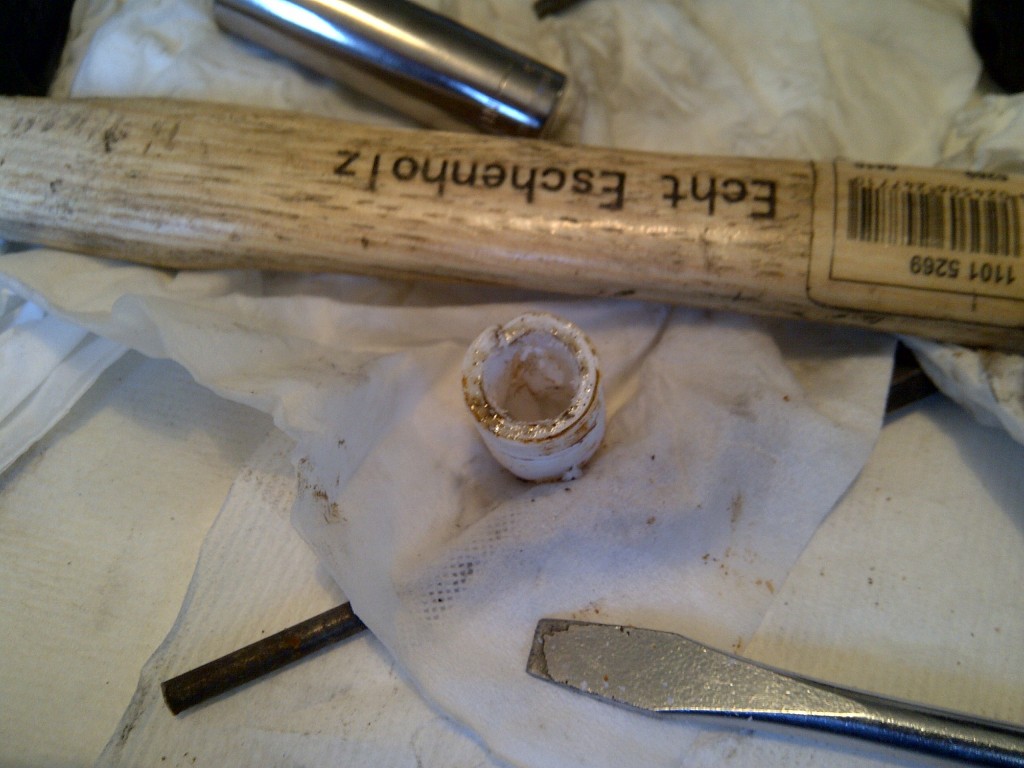
IMG-20130113-00190

6. Once the white sleeve is removed, you will have to clean the inside of the outer bore where the sleeve was sitting. If the circlip was rusty, you will likely also find rust inside of the bore. Using Scotchbrite, steel wool, or very fine sandpaper, remove the red rust from the bore. Clean the bore to remove the residue from this round of cleaning.
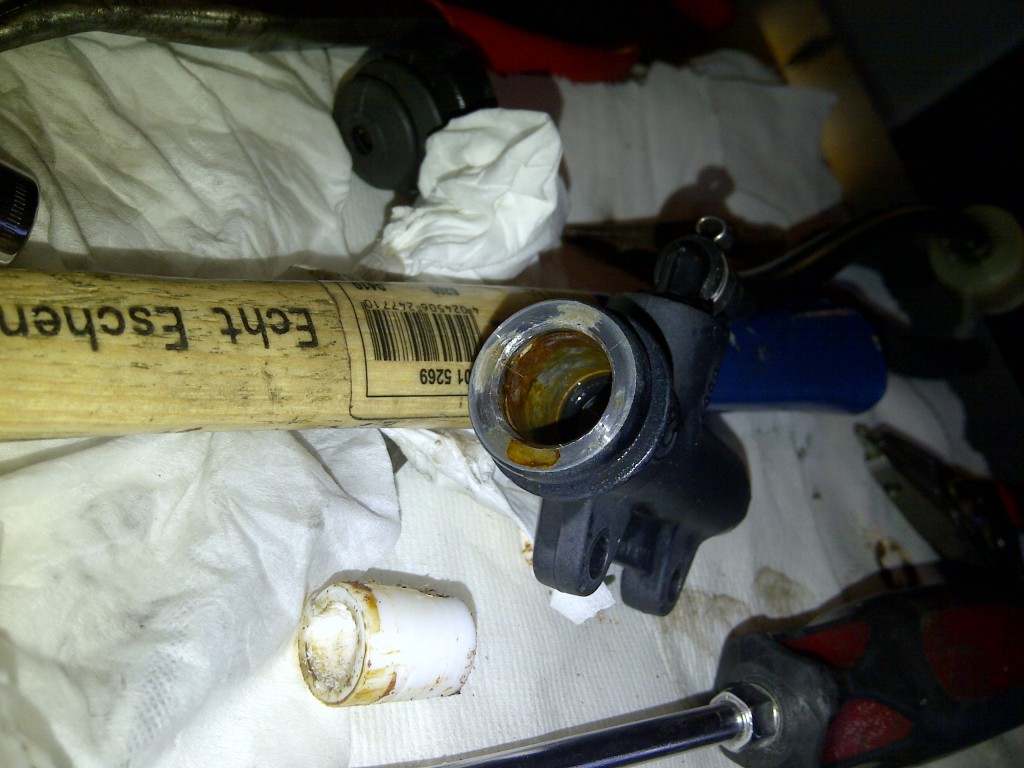
IMG-20130113-00188

7. This step is critical to determining whether the MC is going to be repairable for any length of time. After the red rust is removed, use a pick to investigate the condition of the outer bore. If you have tiny fingers, they will work, too. Now, you are looking for corrosion of the aluminium cylinder body. This is the corrosion that is causing the piston to stick, not the red rust. Using a pick, gently flake away any aluminium oxide that has built up in the bore. Under the oxide will be pits. There is no getting around this. Fortunately, these pits do not interfere with the operation of the cylinder if they are properly treated prior to reassembly. This process is slow and time-consuming, but will pay off in the end. When you have removed the fluffy stuff, carefully clean the entire MC and the reservoir and feed line. Blow them out well with clean water and air, and dry thoroughly.

8. When you have removed the aluminium oxide from the bore, it is time to open up the rebuild kit and start putting things back together. Remove the white sleeve from the kit and test fit it to the bore. It should float smoothly in the bore with only very slight resistance to turning or sliding. This indicates that the bore is free of oxide. Remove the white sleeve, and coat the inside of the bore with Loctite Silver or Heavy Duty (black) antiseize. Do not use copper-based antiseize! This coating should be very very light. Coat the new o-ring with brake assembly grease (HMW polyoxyethylene, supplied in the kit) and insert it into the bore. Insert the white sleeve and twist it gently in the bore. Assemble the spring to its spring seat, and slide the spring into the bore. Coat the piston and seal with brake assembly grease and insert them into the bore. The piston will stick out a bit.
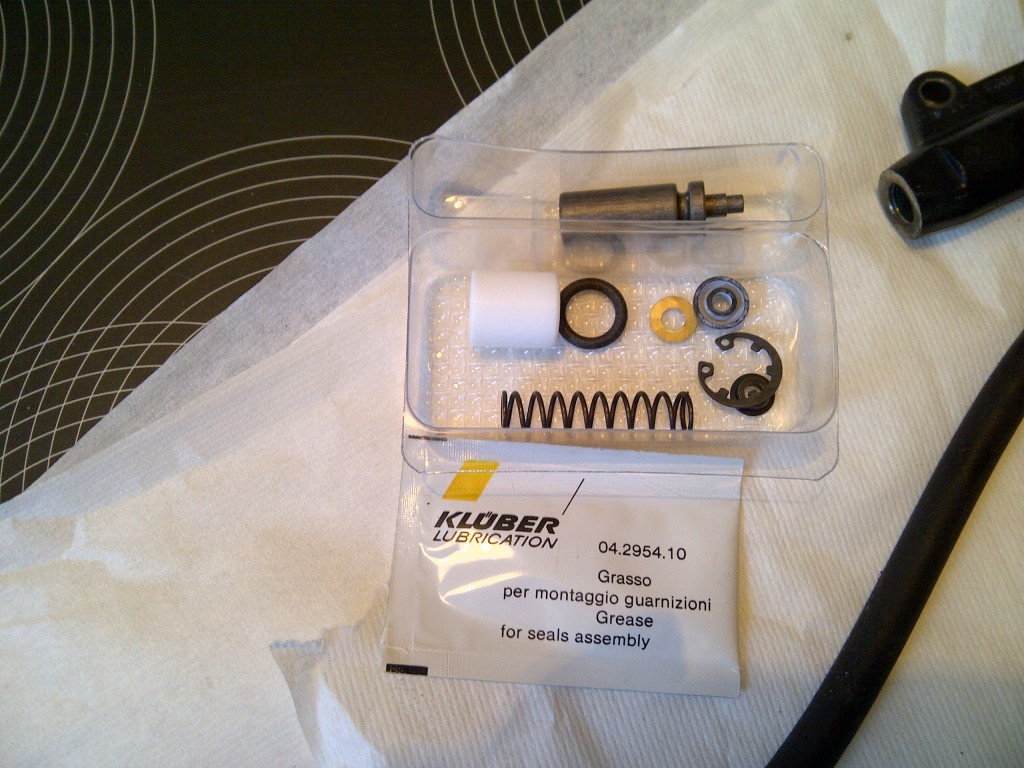
IMG-20130113-00183

9. To finish the assembly, fit the new circlip to the inside circlip pliers.  Secure the master cylinder body and hold the circlip over the piston. Using a suitable drift, inserted through the center of the circlip, depress the piston into the MC, and secure the circlip. Treat the circlip with a drop of wicking grade low-strength threadlocker and, using a pick, draw the threadlocker around the circlip to coat it evenly.
IMG-20130113-00191

10. Bench bleed the MC and install it to the motorbike, in reverse order of removal. Fully bleed the braking system, including at least one ABS activation in the middle of the process.

Conclusion: The boot on the MC is poorly designed and encourages water to enter the space within the boot. Basically, the boot should be inserted into the MC, not sitting on the outside. This moisture leads to corrosion of the circlip. However, corrosion of the circlip is not the reason the whole thing fails, it is just part of a chain reaction of fail. Once the iron starts to go, it triggers a galvanic reaction in the aluminium and the aluminium begins to corrode. The problem is that aluminium oxide is fluffy. Very fluffy. And very incompressibly crystalline. This increase in volume puts pressure on the white sleeve and eventually causes the piston to bind.

My fix: Forget grease. It won’t hold up. Use a heavy duty anti-seize product like Loctite Silver or Heavy Duty (black) to fill the void between the sleeve and bore, and then coat the circlip with low-strength (green) wicking threadlocker, which is commonly used as an anti-corrosive coating on automotive fasteners. If you are in Aviation and have access to Alodine 1424 or the like, a coating of this on the inside of the sleeve bore (along with overnight drying) will also go a long way to preventing repeat performances.

It doesn’t sound too hard, does it, to buy a pair of coveralls that fit? Well, I am female….

Years ago, I purchased a pair of navy blue size 38 regular Dickies coveralls for use around the house and garage. They got about 10 minutes of use before they were ditched for old jeans and a ratty tshirt. Why? Remember what I said about coveralls that fit?

Admittedly, there aren’t quite as many women wearing coveralls as there are guys out there, so it’s no surprise that a decently-fitting pair is hard to come by. Add in that a fair number of the women out there who do wear coveralls aren’t built like Lauren Bacall, and you have a market that isn’t all that attractive to coveralls makers. Because it consists of about four total women.

The difference between coveralls for men and coveralls for women is easy to spot. Women’s coveralls have room for boobs and butts. They also have shorter back-waists – the distance from the collar to the waistline. Mine went into the bin-of-things-we-don’t-know-what-to-do-with because minus the boob and butt room and being too long on the top, I was spending more time adjusting them than a Major League Baseball player spends adjusting his you-know-whats.

Last summer, I was going through that bin and pulled out the coveralls. Hmm, project? Sure! I’d already re-sized and significantly altered a two-layer Nomex suit for racing cars, how hard could a pair of coveralls be? The good designers at Dickies were a lot more serious about these things staying together than peeps over at Speed Sport Racing! The coveralls took me over eight hours simply to dismantle to the point that alteration could begin. Adding to the mess was the most complex elastic waist I’ve ever seen, one that requires a special machine to properly install. I got the bulk of the fitting done over the next few weeks, but the elastic waist and its complexity beat me, and I put the project on hold for a while.

Until today.

Alterations are typically bread and butter work for a seamstress. Relatively simply even when complex, and rarely requiring more than a few pins here or there to set up seams. Occasionally, you get something over the top, and you have to resort to machine basting. At the very tip-top of annoying and difficult seams come the ones you have to hand baste – sew by hand before you sew them properly with a machine. I had set aside the annoying elastic waist when exuberant pinning did not solve the problem. Sometime in the winter, I took a stab at it with machine basting. Today, I sucked in a lot of air and got out the pin cushion and thread: I would hand baste this thing and finish it off. Four hours later, three spent out in my garden in the sunshine, and I was rewarded for my effort with a pair of very stock-looking, properly fitting coveralls.

They look completely off-the-shelf. I like that. I just wish they had been off-the-shelf to begin with!

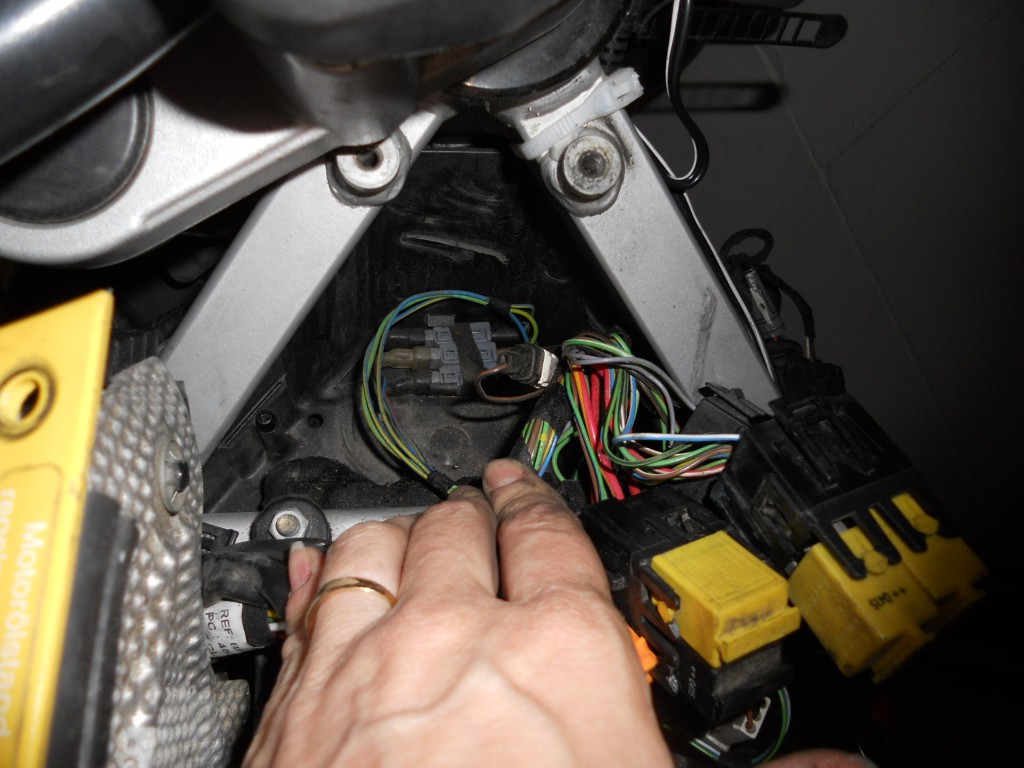
What? you don’t take apart your motorcycle on your birthday? Well, I do. Pics are for the rest of the brave F650-riding community. You can see the placement of the three switch diodes, and the BMS diode in the wiring tray and harness. Next up is the actual diodes, which are ultrasonically bonded to the tabs. This is a decent method of fixturing, but as with all mechanical fixturing, it’s prone to fracture. The result? A No Run or No Start condition that is one heck of a pain to diagnose.

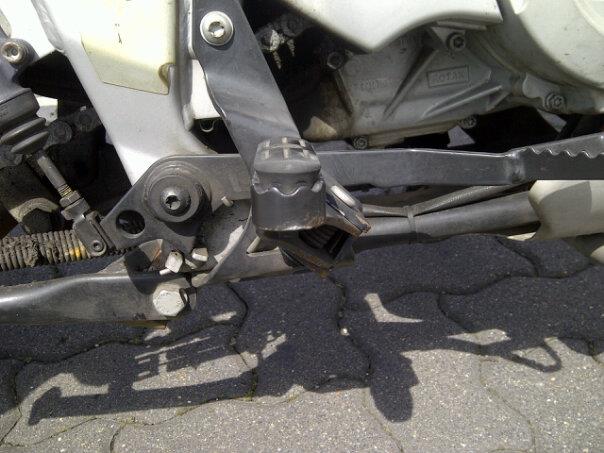
There are a lot of firsts in motorcycling – the first big lean, the first successful evasive maneuver, the first time to split lanes. This is a picture of the right side footpeg on my F650GSa, freshly ground. The pegs on the F are spring-loaded and retract under contact, so the grind is less of an event than it is on most bikes running fixed pegs.

Grinding is a weird sensation. If your foot is positioned properly (toe tucked in), you only feel the vibration through the bike.  You can hear the metal grinding away, and it’s a bit surprising. It was one of those “oh, that’s what that is like” moments.

I think I want to do it again on the other side.

That is all, really. Turned over 3500kms on the not a big Ford truck this week. It’s surprisingly liberating to ride. I had no idea that the biggest benefit would be being far more calm in traffic. You would think I would be nervous with all of the cages around me, but instead, I feel safer. I can get away from them. I can avoid the worst traffic. I can filter. I’m still not ready to split, but I’m sure that will come, probably with a Ninjette or something else a little smaller. This truly has been a game-changer for me, and the game is now on.

After being told that my packages were undeliverable, I did what scientists due: I researched it. I called the USPS station that delivers to my house in Michigan and asked them if the address was good. It took me a while to get there, at least three phone calls, but Jeremy answered the phone and asked me right off the bat, was I getting any mail there. Yeah, I get baskets of junk mail. Then, dude, the address is good. We deliver if the address is good. Your address is fine, ma’am. You have a good carrier and that route is a nice one. Thank you for confirming, Jeremy.

I called Aetna back. This time, I asked for a supervisor, who swore up and down she would call back in 40 minutes. After about two hours, I called again, and as usual, the third time was the charm. I somehow to get connected to the actual pharmacy service (instead of “customer” service), and spoke to a guy who not only could see the entire file, but started from scratch with the data, checking and double-checking the address information. We got as far as the ZIP code when he asked me if my town was near Akron, MI.

Any modern piece of software that ends up printing a shipping label has a neat feature called ZIP code cross-check. This automatically populates the city field based on the ZIP code entered. Pharmacy guy found the error with minimal effort – the city that was typed into the manual entry field was different than the city from the ZIP code, because the ZIP code had not been transcribed properly. One digit was off.

I’ve reconfirmed that address with at least five Aetna reps over the last two months. Not one of them noticed the ZIP code error. This kind of issue is what software is supposed to fix for us – to reduce the impact of human error. In this case, the software worked fine. But apparently it required its user to understand the importance of what it was doing. This is just more proof that there is still no cure for stupid.

I live in Germany (duh). My generous employer contracts with Aetna International to manage my health care benefits.  This has produced some rather funny phone calls that have left me with a serious case of indigestion. Most focus around the pharmacy benefit – Aetna’s international plan strongly recommends that participants use the Aetna mail-order pharmacy to save costs. Sounds good, right? Until you discover that they don’ t ship out of the country.

My first go-around with these people centered around two reps at the pharmacy call center who were sure that Aetna shiped to Germany “all the time”. I repeatedly told both of them that NO, I DO NOT LIVE ON AN AIRBASE. I HAVE A GERMAN POST CODE. Both swore up and down that this was no problem. Four weeks later, I was sitting in the office of a German doctor, begging in broken German for a maintenance medication that is so rarely prescribed over here that she had to call a pharmacy to see if it was even available! It turned out to cost four times what the US generic price is due to being unusual.

Once I had some meds, I returned to the phone. Since not only does the US Government prohibit US pharmacies from shipping out of the country (APOs and FPOs are technically US addresses, so don’t count), Aetna refuses to allow its reps to make international calls, severely limiting the contact options for those customers living overseas. Once I determined (I had about 6 hours into phone calls at this point) that I was on my own, I figured out that I could get the meds shipped to my job and the kind staff in shipping would forward them to me.

This worked fine, until the USPS decided that I no longer lived at my house.