Chemistry

Reminds me of the old book “MBO Can Work!” Um, not really, but that is out of scope for today.

Tech Push is a business practice where technological innovation is pushed from the lab into the market. If you ask the question “can Tech Push work?” to an assortment of people working in new product introduction, you will get a variety of answers. A smaller segment will extol the virtues of one or another projects that they sent to market, while others will vigorously swear up and down that the lab has never developed anything that was actually necessary. The truth, as usual, is somewhere in between.

The opposite side of Tech Push is Market Pull, when the market demands a change and tries to pry it out of the lab. Often, the laws of physics come into play – as far as I know, no one has defeated them and lived. If the state of the art in technology hasn’t progressed to what the market wants, the market is stuck waiting for technology to catch up. It’s the proverbial better mousetrap problem.

The great middle requires redefining Tech Push into two different tacks: Blind Tech Push and Informed Tech Push. Blind Tech Push is the classic version. Think of the Apple Newton. An answer to a question no one asked. AT THE TIME. In 1993, no one had any idea what to do with the thing. In 2003, when RIM released the first BlackBerry device, email had taken over as a primary communication means and the role of a personal multi-mode communication device was much more obvious. In fact, the history of devices of all types is littered with things that were released too early into the market and for that reason alone, failed. These Blind Tech Pushes are the ones people think of when they say that they view Tech Push as a failure.

The second aspect of Tech Push is Informed Tech Push. My favorite quote to illustrate this point is from Henry Ford – “if I’d asked the people what they wanted, they’d have asked for a faster horse.” In this case, the market was pulling for a faster horse, and Ford knew that that wasn’t going to happen. But he could replace the horse with something faster, more fuel efficient, and lower maintenance. The Model T (in fact, all of Ford’s work and before his, Karl Benz’) was dependent on an understanding of the market demands and production of new technology to meet them. Hr Benz, however, was actually nearly a victim of Blind Tech Push – without his wife Bertha’s intervention, the Benz Patent Motorwagen would have been a footnote of history. Bertha Benz’ willingness to reach out to the market and tap a vein of desire (go off to visit family for a quick, safe jaunt!) allowed Benz to reach the market successfully and paved the way for the rest of the auto industry.

More recent examples of Informed Tech Push include the Nespresso coffee machine (you didn’t see that coming) and the FitBit, both of which carved markets seemingly out of the air. I’m ignoring the iPod here, because the market for mobile music players already existed, and the iPod was evolutionary in meeting market demand for smaller, faster, cheaper. In the case of Nespresso, the concept of single cup brewing was not new. Neither was hermetic packaging of foods. What was missing was the market for a $4 cup of high quality coffee. Up until good coffee became desirable in the US, it was virtually impossible to move the rather expensive single cup brewers that existed. Packaging issues with small volumes of ground coffee were too expensive to overcome, and the quality of coffee brewed in existing systems was actually dismal. However, by watching the market closely and following the price points of in-cafe coffee purchases, Nestle was able to introduce the (for the market) completely novel concept of long-term storable high-quality coffee in capsules combined with a brewing mechanism that looked like art and produced a very high quality cup of coffee, all at the newly accessible price point. If this sounds like market timing, it is. Informed Tech Push is all about market timing.

In the case of FitBit, micro accelerometer technology was available and recently deployed by Nintendo in the Wii. America had gotten the hang being measured with games like DanceDanceRevolution (in gym class, no less) and GuitarHero. The staff at FitBit saw the opportunity to move this technology into the world of personal health. Rather than languishing in the fitness world where only the hardcore participated, they looked to a chronically underserved market – people sitting on their butts. Of which there are significantly more. By reading the market and understanding the goals of the larger personal health target audience, they were able to do what Nike and Garmin had failed at – capture the attention of the non-gym rat crowd.

In all cases, a careful dance with the left foot of the lab and the right foot of marketing allowed new technology to carve out a solid market and succeed.

When you think about Tech Push and Market Pull, remember that they rarely work independently. They work best when the tech is ready before the market is, but never without a clear understanding of what the market actually needs and wants.

© 2015 www.atomicalex.com

I’ve been unable to track down the origin of the phrase “a job so simple a monkey can do it”, so I’ll make do here with a few other monkey aphorisms. All to set up for a useful post, I promise.

Some years (or eons) ago, it was posited that if you gave a million monkeys each a typewriter, eventually one would hack out some Shakespeare. Actually, it’s called the infinite monkey theorem, and it says (per Wikipedia) that a monkey hitting keys at random on a typewriter keyboard for an infinite amount of time will almost surely type a given text, such as the complete works of William Shakespeare. In truth, the monkeys did not type anything useful at all, and destroyed the typewriters in the process.

A monkey wrench is a wrench that is make-do, can be arranged to work in a given situation. It turns out to have a nautical origin in name, and a horsedrawn carriage origin in function. It is actually not a pipe wrench, being that the jaws are perpendicular to the handle instead of angled as in a pipe wrench. They are also often flat instead of toothed. But they can be monkeyed around with until they work, for sure.

Throwing the monkey wrench into something is another name for sabotage.

CareerBuilder.com’s monkey advertisements reinforced the idea the monkeys are not anyone’s choice of top recruits for jobs that might provide a decent paycheck.

Monkeys are a metaphor for small, unreliable operations and operators that can go wrongly, often with spectacularly bad (ok, hilarious) results.

Let’s head back to the monkeys on the job.

During work on a large, game-changing software installation that I recently participated it, a healthy debate set up between some of the stakeholders, one group of which wanted a process that “a monkey could operate”, and one group who wanted an expert process. Middle ground was, as usual, scarce. The process in question was a stage and gate process and one of the complexities was the processing of gates – should it be automated or should it require intervention from humans skilled in the art?

This posed two rather fundamental process governance questions – how complex should the process be, and how much knowledge should be required to operate it?

The governance issue was the subject of much debate within the chartering organization, and both sides made compelling arguments. The monkey side wanted a process that could not be perverted for individual gain and that would not place additional burden on the already thin staff. The expert side wanted to know that the right decisions were being made regardless of a number, that no opportunities were being missed, and that common sense would always prevail. Both agreed that the governance of the process was critical to its success and turned back to the team for an answer.

Out of this challenge, my team, the team in charge of implementation, threw up our hands in frustration and exclaimed “if the process is so simple that it only requires monkeys to operate, then why do we need (to pay) senior managers?” We christened this “the monkey rule”.

We created a paradox in the process: the only people who could specify a monkey-enabled process were the senior managers, who then would become irrelevant in doing so. At the same time, the managers demanding as expert process were committing to the work required, because it could not be delegated to monkeys by virtue of its expert content.

Both arguments hold water – some processes are suitable for “monkey-enabling” and others will never make it out of the C-suite. The middle ground is where application of the monkey rule is required. For example, simple invoice checking for completeness is a relatively straightforward process – are all of the pieces of information there? Ok, move it on to the next step. Choosing a vendor is much more complex and not all of the useful information has a numeric value or can be converted to one. How do you rate the sole proprietor’s chances of a heart attack in the next ten months? Well, it probably starts with a phone call and might proceed to a face-to-face meeting over lunch. Things that are often handled by managers of some level with some amount of gut expertise. An expert, if you will.

In the end, the team and the chartering organization went the route of the expert process requiring the senior managers to actively participate. It’s mostly working, and it’s generating accountability that was previously unheard of in the organization. It’s also revealing some opportunities for improvement and a non-trivial number of missing experts.

Most importantly, the monkey rule served its purpose – to differentiate between the truly monkey-level tasks and those that do require a well-funded paycheck. Our managers are still being paid.

Where are you going to deploy the monkey rule?

© 2015

The bike runs now. Actually, it ran last week. The magic ingredient? The fuel tank.

I tested out my newly refreshed CDI box on a second bike, and it ran fine. The CDI refresh was done by Carmo in the Netherlands, seemingly the only place in the world doing this work. Came home and no luck. So… What was different? The only difference between the two bikes was that the other one had the tank mounted and hooked up. Something so simple……

This is important because attached to the fuel tank is a vacuum petcock, and the hoses that operate it.

While I’d been careful to close off the vacuum port on the side of the intake that opens the petcock, I hadn’t closed off the fuel feed line to the carb. So I was either running out of vacuum, or running out of vacuum. The Mikuni carb is a constant-vacuum type and requires militant fastidiousness when it comes to policing the vacuum lines. I’ve honestly never seen anything like this. Even my poor old Passat will fire and run with some vac lines open, being a modern Bosch innovation. My Rabbit would run with most of the intake missing, and it was merely K-Jet. Perfection, I tell you!

Since getting it running, I’ve also rejetted the carb, going up one size each on the main and pilot jets to #130 and #20 from #127.5 and #19. I’ve found references to this pair, and also to simply moving the pilot jet up to a #30 while keeping the stock #127.5 for the main. I expect my summer to involve a fair amount of carb tuning and experimentation – which will be great because it will put me in a much better position to handle little Japanese bikes in the future, and hopefully prepare me for a future life of Bing.

Yeah. I’m going there. Two Bings, to be exact.

I find a lot of people who don’t like guacamole, but then eat gobs of the guac I make. So, here is my dirty, secret recipe.

2-3 mostly ripe avacados
2T dehydrated chopped onions (I prefer the McCormick ones)
1.5oz lemon juice
salt to taste, ~1/2tsp

Halve and scrape out the avacados, them mash them up. Mostly ripe is key – better not quite ripe than overly ripe.

Put the dehydrated chopped onions and lemon juice in a microwave-proof cup and microwave them for about 20 seconds, twice. This will reconstitute them – puff them back up. They need to be fully puffed, so hit them again if necessary.

Mix reconstituted onion flakes into mashed avacados and mix well.

Add salt to taste.

There you go. Basic, Mexican guacamole. No fancy flavors, no tomatoes (yikes, tomatoes always turn me off), nothing. The big secret is using the lemon juice to reconstitute the onions. I don’t even remember when I first started making it this way, but it works.

I guarantee you will like it. Add whatever you want, if you are one of those TexMex types. We Mexico-Mexican types will enjoy it plain, thank you.

It’s all about the flour.

Some time ago, I grabbed a bag of Pamela’s Artisan Flour Blend, simply because it came in a big bag. I was rewarded with a flour that bakes pretty well, including things like pie crust. I modified the old American Heart Association oil crust recipe to handle the Pamela’s flour, and it bakes up fantastically.

2 cups Pamela’s Artisan Flour Blend

1 t baking powder

1/4 t salt

1/2 to 3/4 cup water

1/2 cup oil

Blend the dry ingredients. Add water to oil in a measuring cup and add to dry ingredient mix. Add water as needed to get texture right. The texture and general behaviour of the crust are uniquely GF as it is not as short as one would like, but overall, it is a serviceable crust that will not let you down. The baking powder is the secret and makes the crust flaky and fun.

Let me know how you do with it.

I said ouch. That really doesn’t cover it. A PDPH headache is profoundly disabling and should not be taken lightly. I thought about it, and came up with this description: PDPH is like your head having back labor without the breaks in between contractions. Add in repeated hammer blows, and you are getting close. IE – if you’re a guy, you can’t even begin to imagine what this feels like. I suppose you could start with crushing your balls in a vice, but even that would just be starting to get  close to back labor.

On day four, I caved and called the ambulance. I’d woken up at 0230 in pain and was unable to find a position that reduced it. I’d tried drinking more water, taking an extra acetaminophen, and walking around. I ate a couple of gluten-free rolls. Nothing was helping, so I picked up the phone. The first ER sent me off to the big university hospital where my neurologist is based, and things got moving there. The ER doctor smiled a sad of kind smile and said “we can try some different drugs, but you just need to lay down”. I must have had the most incredible expression on my face. I remember telling her that I just wanted to sleep. Some medication appeared, and I fell asleep. Two hours later, I awoke and was whisked upstairs into a double room, where I promptly fell right back asleep. For several hours. Make that days. I slept through day five and most of day six. As I did this on one side, without moving very much, I managed to pinch a nerve on the left side of my skull, which took some time to unkink and left me with a stuffed up eustachian tube for a while.

On the afternoon of day seven, I sat fully upright for the first time in a week. A few flights of stairs brought back the tinnitis, but it abated after a while. The Chief of Neurology visited and said “you sign the form, but it really doesn’t prepare you, does it?” No, it does not. She was quite kind, something often missing in doctors, and went through my symptoms and how the situation progressed. She noted that when she saw my chart, the first thing she thought was “skinny chick, she’s toast”. And there I was, toast. She also confirmed one of my suspicions – that the most damning factor is low blood pressure. As I’d woken up one morning and produced a spectactularly fabulous 80/60, you can see where I was coming from.

Day eight was finally the day that I could say I was human again. After a week of either significant or total disability, I was so thrilled to simply stand up tall that I wanted to walk around for hours. Had the sun been out, I think I would have fainted from joy. I was discharged and went shopping, just to look at things that weren’t on the floor.

The moral of this short series is that, in the words of Mark Twain (who is actually not the author of the quote), there are lies, damn lies, and statistics. And in this case, the statistics told the truth, but not the truth that applied to me.

For those who don’t get the joke (seemingly everyone I know), the title refers to a line in the movie Spinal Tap, in which lead guitarist Nigel Tufnel informs journalist Marti DiBergi that his Marshall amplifier head is “one louder” because the volume knob is numbered from one to eleven, instead of one to ten like a regular production model.

There you have it. I have now had a spinal tap. Also known as a lumbar or dural puncture, it’s a test used to identify issues involving cerebral-spinal fluid, the stuff that keeps your brain afloat in your head and prevents concussions from occuring when you move your head around. The actual spinal tap procedure is not particularly painful. If you’re me, it doesn’t really hurt at all. Removing the needle is more painful than inserting it. Et cetera. If you don’t mind, I’ll keep the reasons for the test private. The results were  completely negative, which should suffice.

All of this is not sounding especially exciting, is it? Certainly not enough for a blog post from this somewhat reluctant blogger. You are correct, so far, the whole spinal tap thing is, frankly, another boring medical procedure that people occasionally have to undergo. You go to the doctor’s office, sign some forms, and get poked in the back. Typically using 22g Quincke needle, between L4 and L5. About 5ml of fluid is removed, you lay down and rest for a little bit and then you go your merry way.

My neurologist, a rather studied dude who carefully answered my questions about the procedure, was rather business-like throughout the whole affair. The actual puncture is a very routine procedure, one done by neurologists  on a very regular basis. It is the full Monty, while the more common epidural insertion is the specialty of anesthesiologists. In an epidural, care is taken to avoid a dural puncture, because firstly, it’s not necessary, and secondly, well, it can cause issues.

The issue in question here is called the Post-Dural-Puncture Headache. It’s why you have to sign that release form before the test.

The 11mm Brembo master cylinder fitted to the rear braking system on many Aprilia, BMW, and KTM motorcycles is a weak point, to put it mildly. Regardless, it is fixable. See below for how and why.

0. Tools required
Inside circlip pliers
10mm socket
5mm hex drive
2mm long drift (10cm) or 2mm Allen wrench
Tack hammer
Long-nose pliers
Flat-head screwdriver
Dental picks
Dremel with small round cutting bit
One full rebuild kit from Brembo, part number 110.4362.41

1. Remove the master cylinder from the bike. To do this, remove the bolt holding the brake fluid reservoir and washer with a 10mm socket. Return the bolt and washer to the hole to insure they are not lost. Drain the reservoir and replace the lid and gasket. Release the brake line fitting from the top of the master cylinder and back it out entirely. Remove the two bolts securing the MC to the bike using a 5mm hex drive. Lift the MC away from the bike, clearing the brake line at the top. The push rod will slide out of the rubber boot at the bottom with a slight tug. Return the two hex screws to the bike for safekeeping.

2. Retire to somewhere warm (or cool…), you might be there for a while. Bring the MC with you. Spread some paper towels or other protection out, and drain the master cylinder fully. Set aside the rebuild kit for later.
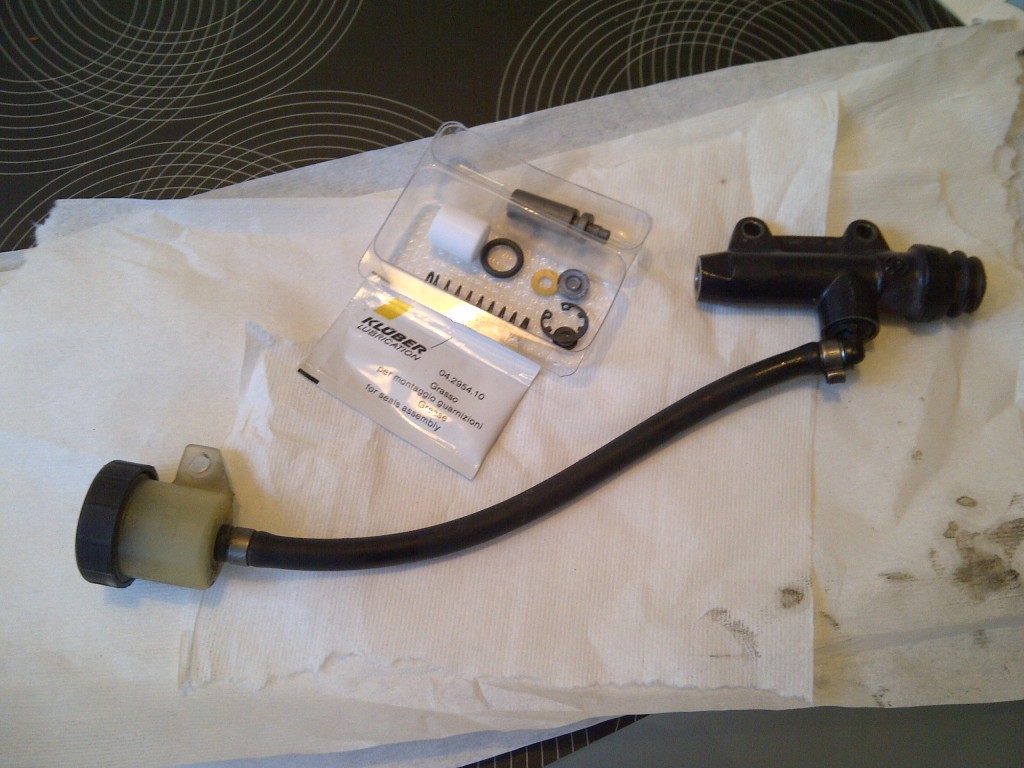
IMG-20130113-00182

3. Carefully examine the MC. Remove the rubber boot by tugging at it gently. To help it, insert a flat screwdriver into the groove at the base of the MC and gently prise the boot away. Looking down the bore of the MC, you will see the piston at the center, a white spacer surrounding the piston, and a circlip holding it all together. The circlip may be rusty, if it is, you have some work on your hands. See below for a good (bad) example of a rusty circlip.
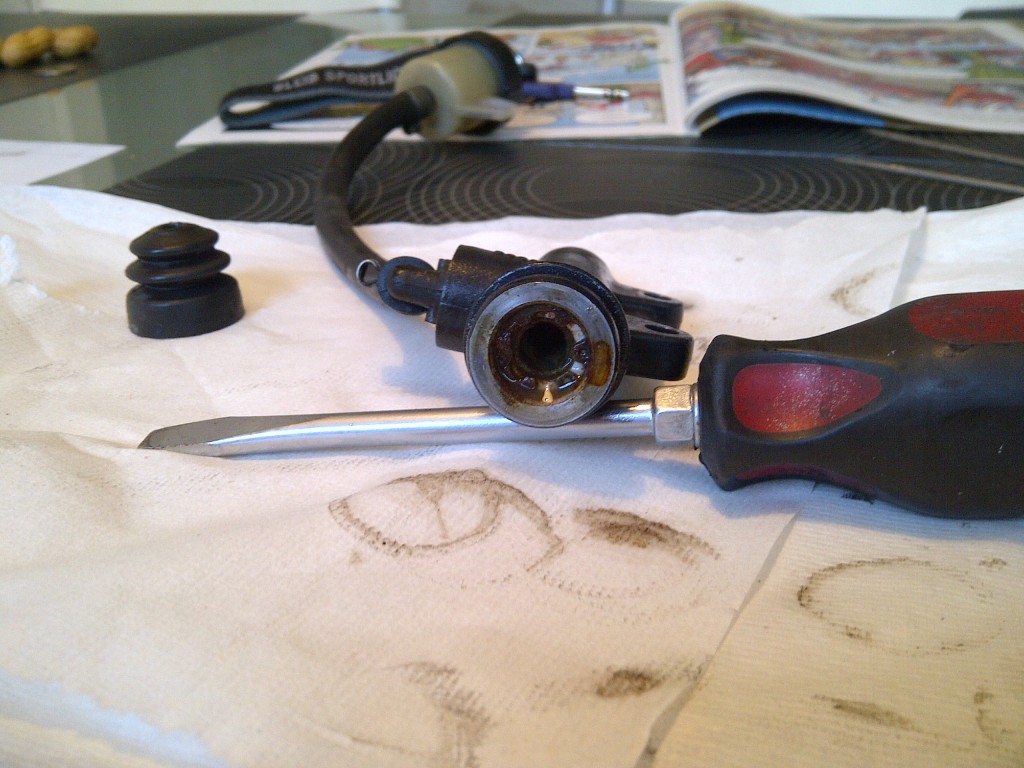
IMG-20130113-00184

4. Remove the circlip using inside ring removing pliers. If the piston is stuck, use a long 2mm drift or a 2mm Allen wrench to drive it out from the top side. Tap the drift or the Allen key gently with a tack hammer, checking the other end for progress occasionally. When approximately 4mm of piston are exposed, gently grab the piston with long nose pliers and slide it out. This will all require some effort. The spring and spring seat will also come out at this time, or can be shaken out gently. Examine the piston for corrosion and clean it.
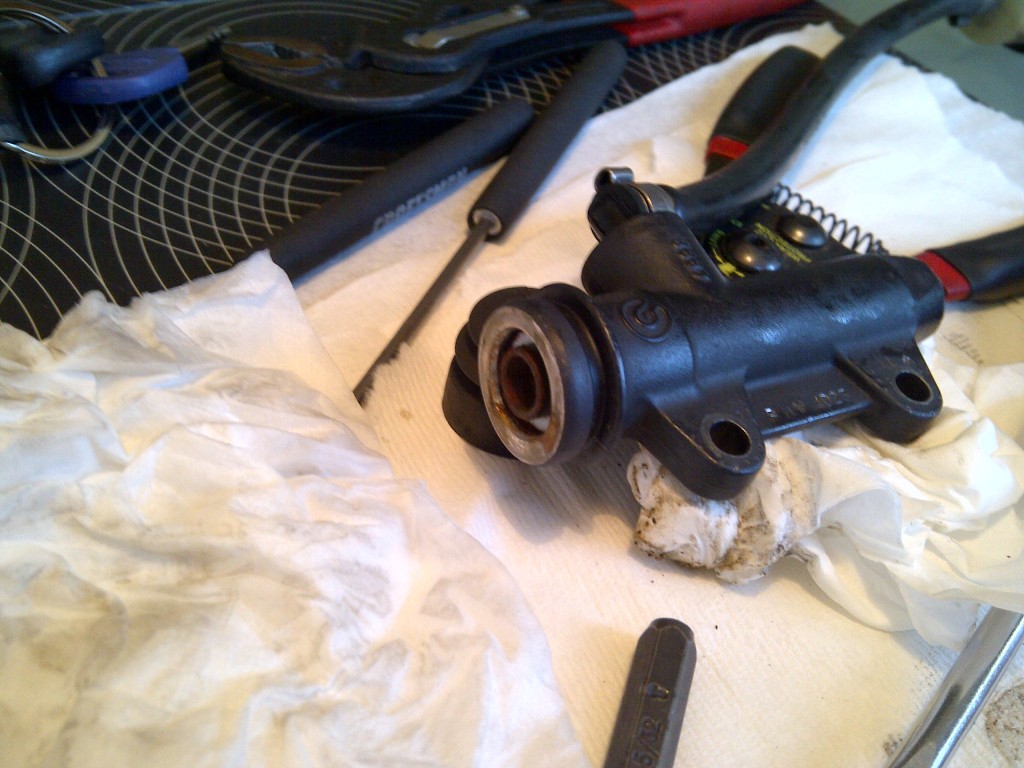
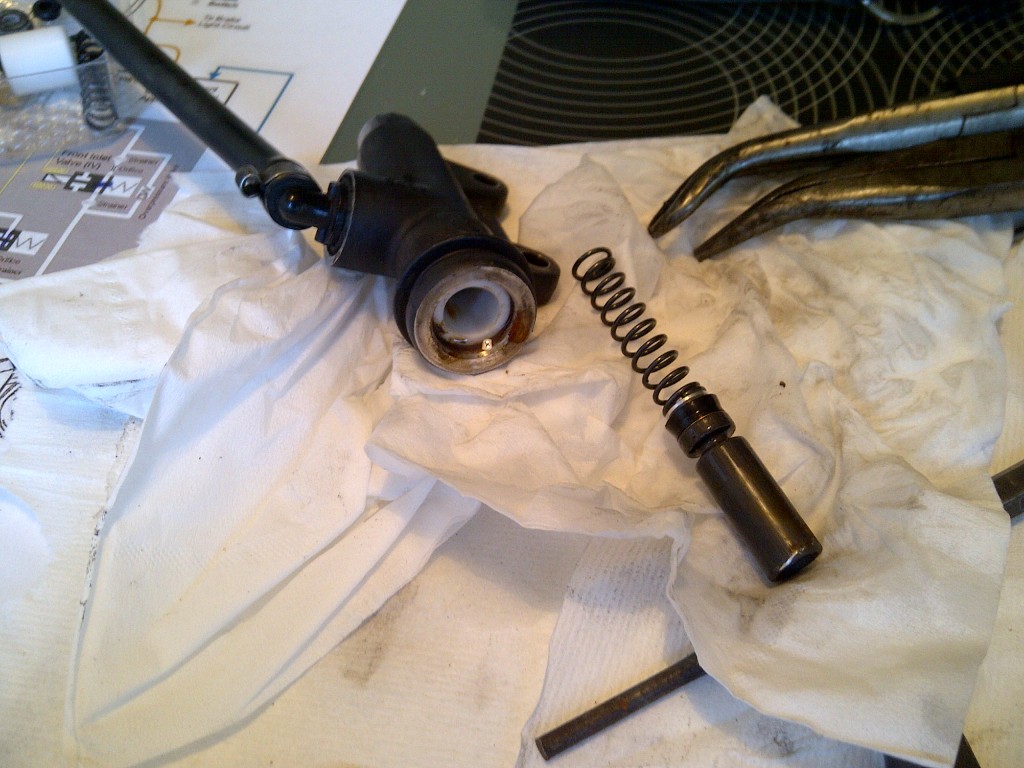
IMG-20130113-00185

IMG-20130113-00187

5. Now for the fun. The white sleeve may not slide out willingly. If it did, you would not likely be attempting this repair. A rather easy way to remove the sleeve is to grind or cut a groove in it. I used a 2mm ball-shaped cutting bit on my Dremel and ground out two channels, one the full length of the sleeve. Using the circlip pliers, twist the sleeve in the MC body and slowly work it out. Another way to remove the sleeve is to turn the bits of a 90° circlip tool to the outside and use it as a puller. In either case, take care not to damage the surface of the bore. It is not a sealing surface, but smooth is very important to the cylinder staying functional for any length of time. After removing the white sleeve, remove the o-ring that is still in the bore.
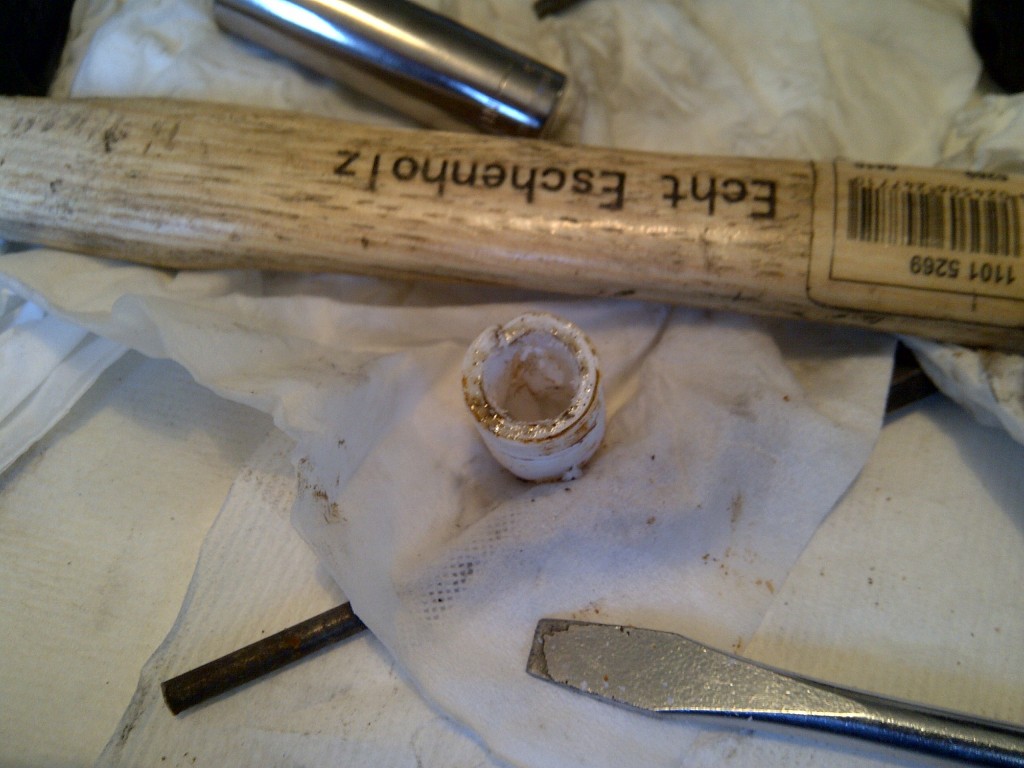
IMG-20130113-00190

6. Once the white sleeve is removed, you will have to clean the inside of the outer bore where the sleeve was sitting. If the circlip was rusty, you will likely also find rust inside of the bore. Using Scotchbrite, steel wool, or very fine sandpaper, remove the red rust from the bore. Clean the bore to remove the residue from this round of cleaning.
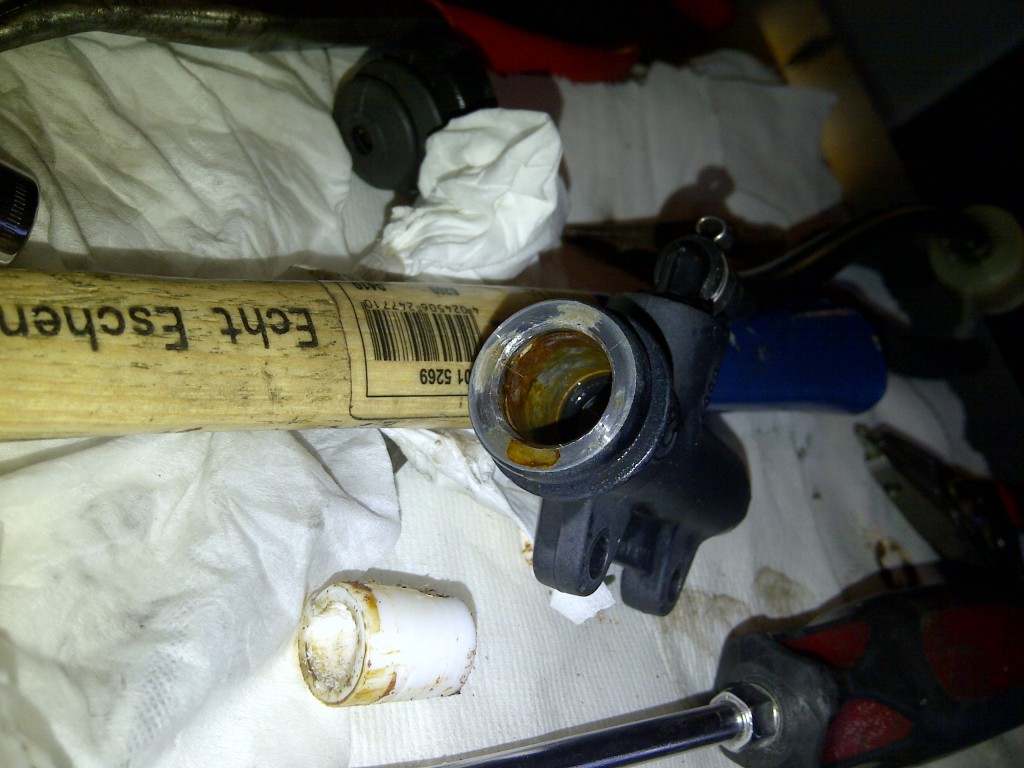
IMG-20130113-00188

7. This step is critical to determining whether the MC is going to be repairable for any length of time. After the red rust is removed, use a pick to investigate the condition of the outer bore. If you have tiny fingers, they will work, too. Now, you are looking for corrosion of the aluminium cylinder body. This is the corrosion that is causing the piston to stick, not the red rust. Using a pick, gently flake away any aluminium oxide that has built up in the bore. Under the oxide will be pits. There is no getting around this. Fortunately, these pits do not interfere with the operation of the cylinder if they are properly treated prior to reassembly. This process is slow and time-consuming, but will pay off in the end. When you have removed the fluffy stuff, carefully clean the entire MC and the reservoir and feed line. Blow them out well with clean water and air, and dry thoroughly.

8. When you have removed the aluminium oxide from the bore, it is time to open up the rebuild kit and start putting things back together. Remove the white sleeve from the kit and test fit it to the bore. It should float smoothly in the bore with only very slight resistance to turning or sliding. This indicates that the bore is free of oxide. Remove the white sleeve, and coat the inside of the bore with Loctite Silver or Heavy Duty (black) antiseize. Do not use copper-based antiseize! This coating should be very very light. Coat the new o-ring with brake assembly grease (HMW polyoxyethylene, supplied in the kit) and insert it into the bore. Insert the white sleeve and twist it gently in the bore. Assemble the spring to its spring seat, and slide the spring into the bore. Coat the piston and seal with brake assembly grease and insert them into the bore. The piston will stick out a bit.
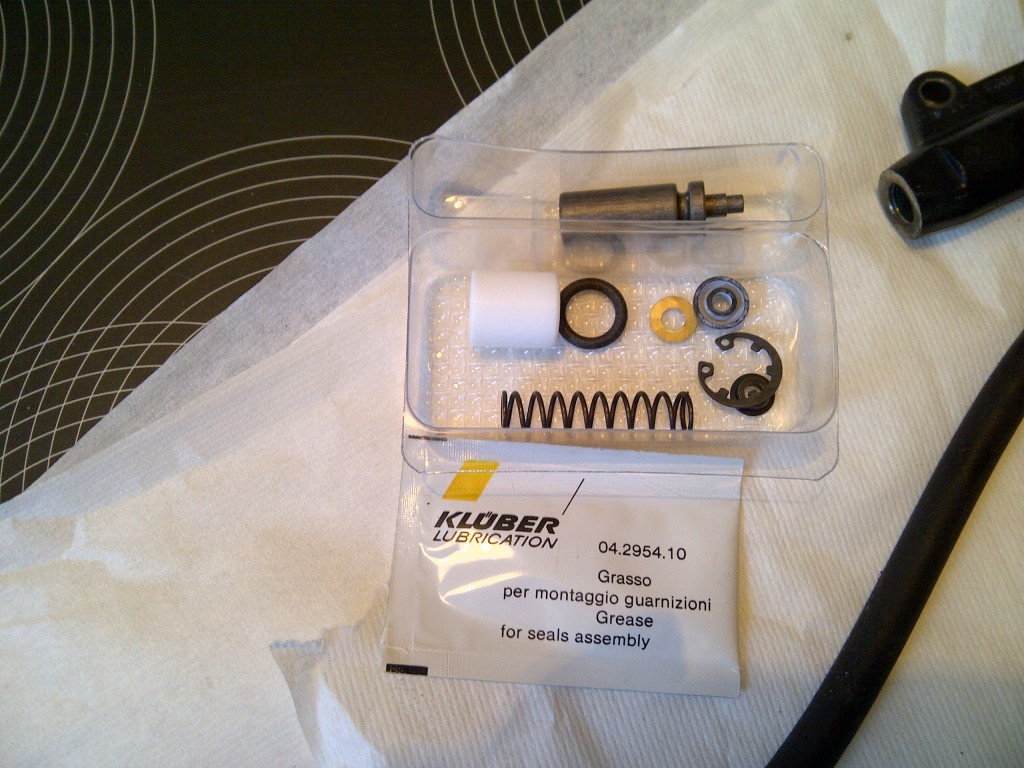
IMG-20130113-00183

9. To finish the assembly, fit the new circlip to the inside circlip pliers.  Secure the master cylinder body and hold the circlip over the piston. Using a suitable drift, inserted through the center of the circlip, depress the piston into the MC, and secure the circlip. Treat the circlip with a drop of wicking grade low-strength threadlocker and, using a pick, draw the threadlocker around the circlip to coat it evenly.
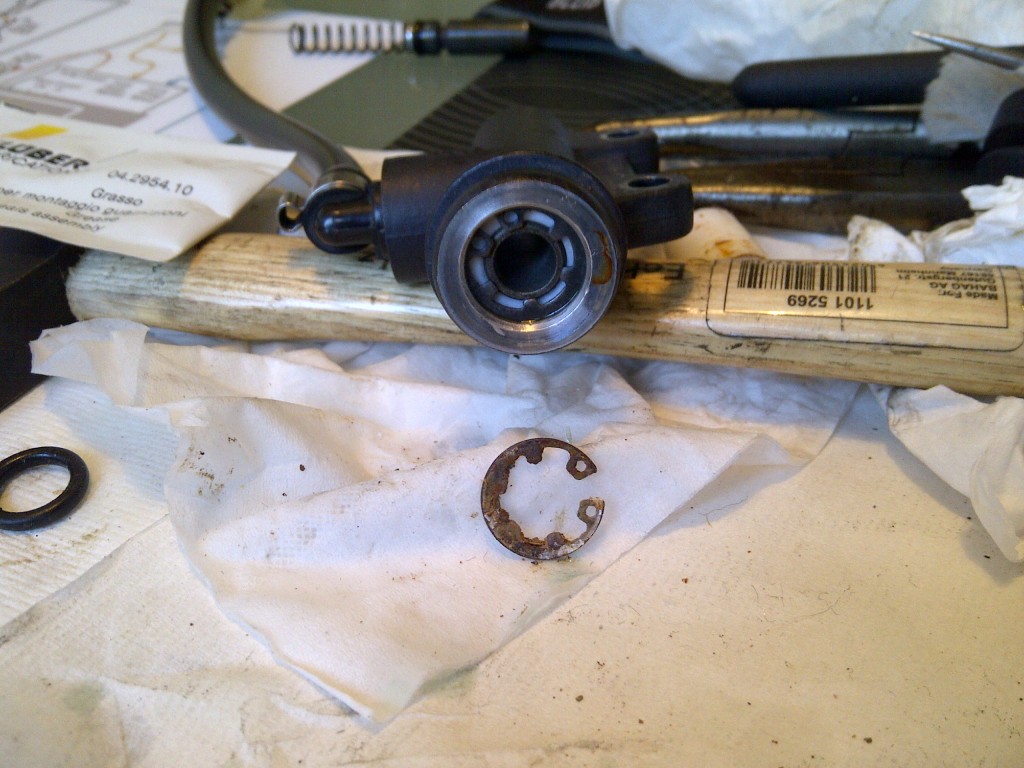
IMG-20130113-00191

10. Bench bleed the MC and install it to the motorbike, in reverse order of removal. Fully bleed the braking system, including at least one ABS activation in the middle of the process.

Conclusion: The boot on the MC is poorly designed and encourages water to enter the space within the boot. Basically, the boot should be inserted into the MC, not sitting on the outside. This moisture leads to corrosion of the circlip. However, corrosion of the circlip is not the reason the whole thing fails, it is just part of a chain reaction of fail. Once the iron starts to go, it triggers a galvanic reaction in the aluminium and the aluminium begins to corrode. The problem is that aluminium oxide is fluffy. Very fluffy. And very incompressibly crystalline. This increase in volume puts pressure on the white sleeve and eventually causes the piston to bind.

My fix: Forget grease. It won’t hold up. Use a heavy duty anti-seize product like Loctite Silver or Heavy Duty (black) to fill the void between the sleeve and bore, and then coat the circlip with low-strength (green) wicking threadlocker, which is commonly used as an anti-corrosive coating on automotive fasteners. If you are in Aviation and have access to Alodine 1424 or the like, a coating of this on the inside of the sleeve bore (along with overnight drying) will also go a long way to preventing repeat performances.

Much more important than people realize, your tyres are riding on this wire…

From my presentation to the Wire Association International in 2004. Still the most wonderful, talented group of engineers I know.

Lubrication in steel wire drawing operations generally brings soap powders to mind. For larger wires this is uniformly the case. The soap powder melts in the wire/die interface and provides a viscous film that supports the drawing force. The fillers and additives in the drawing soap impart polishing, extreme pressure, and many other properties to the lubricants. As wire sizes get smaller, the soap powders become unsuitable for high performance drawing. The viscosity of the molten film is too high, and the film occludes the hole, reducing the wire diameter and eventually breaking the wire. Additives may corrode the wires causing breaks. The polishing aids and other particulate materials may be drawn into the wire, weakening it and resulting in failures. Wet drawing lubricants are required to overcome this problem.

Wet drawing lubricants are based on water and/or oil and have considerably lower viscosities than the molten soaps they replace. This reduces the film thickness and the chances that the film will occlude or block the die orifice. Wet lubricants do not contain particulate materials, so foreign inclusions are not drawn into the surface from the lubricant. The additive level is much lower in a wet lubricant and can be controlled by dilution. The wet lubricants also provide cooling to the operation, a feature absent from dry drawing operations. The wet lubricant requires different maintenance techniques than those required for dry soaps. A comparison of the two types of wet lubricants and their individual requirements for usage will be presented.

Abstract from my 2004 presentation to the Society of Tribologists and Lubrication Engineers….. Probably one of the best papers I have ever given, and winner of the Deutsch award for practical tribology research. That was a big day for me!

Predictive testing of Steel Rolling oils using the Elastohydrodynamic Lubrication Rig

The rolling of steel sheet from continuously cast slabs and coils or ingots to sheet and tin products is a fundamental step in the manufacture of goods worldwide. Slab and sheet reduction is accomplished by plastic deformation of the slab using large metal rolls to apply a force normal to the slab. The contact area between the roll and the slab/sheet must be lubricated to provide proper sheet finish and good tool life. Rolling operations are very large, and it is difficult to test the performance of rolling oils on the mill due to the volume of lubricant and the set-up times required. Development of reliable predictive testing methods is critical for the design of good rolling lubricants.

Rolling oils are typically formulated from fat and mineral oil basestocks with appropriate additive packages and provide hydrodynamic and boundary lubrication to the roll contact. The rolling contact is formed by the plastically deformed sheet and the roll and has three specific zones – the backward slip zone, the neutral point, and the forward slip zone. In both of the slip zones, fresh metal surface is exposed and the process operates in a slip condition. At the neutral point, the contact operates in a true rolling condition. This suggests that a test method with variable slip is for testing and evaluation of rolling lubricant performance.