Archives

All posts by atomicalex

The 3D printing thing escalated quickly.

I figured out how to make robot wheels.

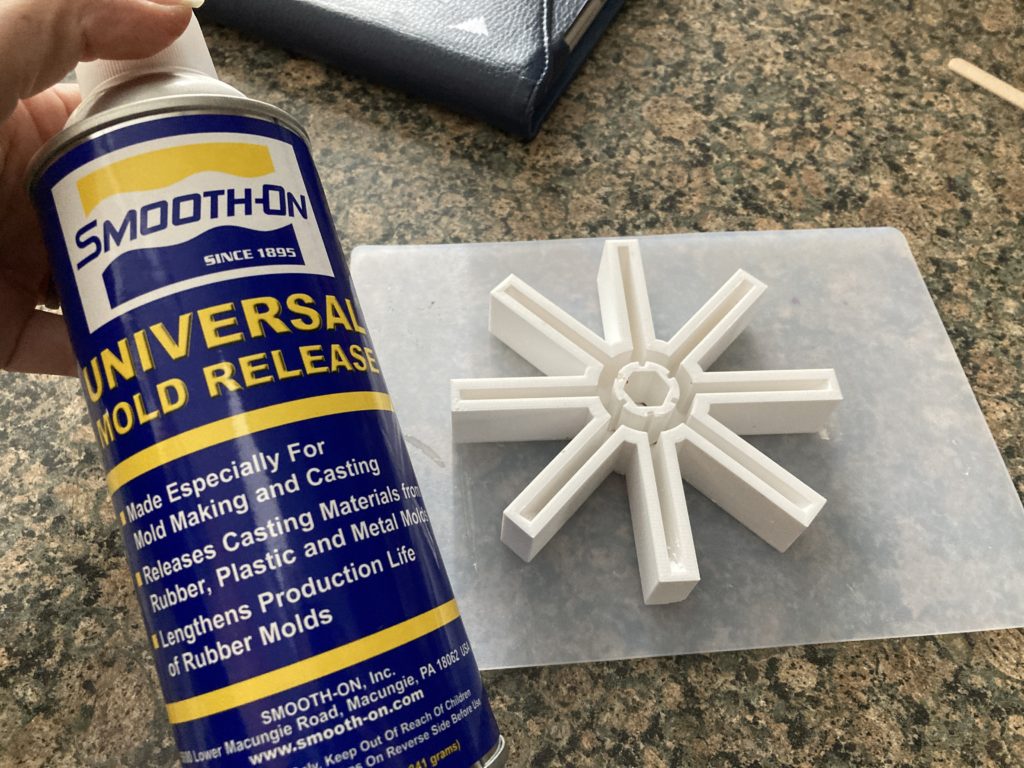
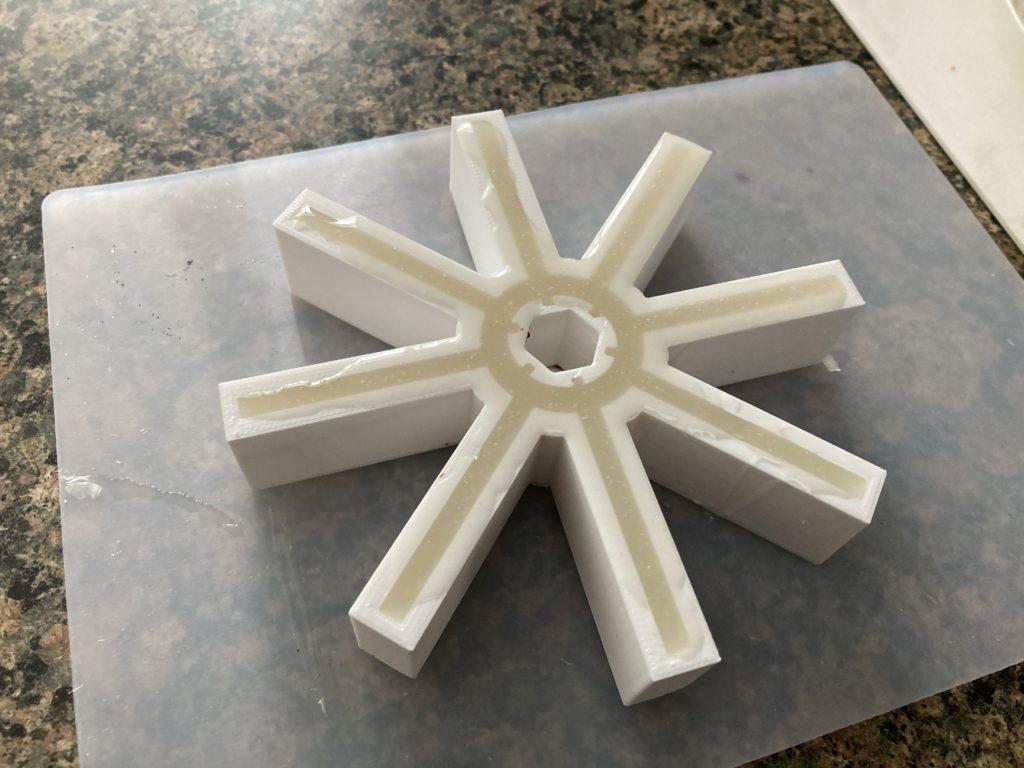
  1. Print a mould. I used PETG as it polishes up nice and holds the mould release agent well. This is for a custom robot wheel. The piece in the middle with come with the urethane when I break it out. The center fits on a 1/2″ hex shaft and the little notches are to hold the urethane better. I used Smooth-On Universal Mould Release for the agent.

2. After spraying the mould with mould release, I made up the urethane rubber. I used PMC-744, a 44A Shore compound. It’s quite floppy, which is perfect because this wheel needs to be ultra compliant.

3. The urethane is a 2:1 mix, and I made 75gr which turned out to be twice what I needed. I need to get better at estimating how much resin I need by doing volume calcs or just filling with water and weighing.

4. Next step is the actual pour. I have the mould sitting on a silicone release pad. Parchment paper also works.

5. Next is the poured mould. I have to strike it off to make the sides level and get the rubber evenly distributed. I could pressure cast it, but I do not have a pressure pot. I sometimes vaccum the castings to get the air out, but not for this test wheel.

6. Last step is to cover it up. Urethanes STINK, so controlling the environment is really useful. Thankfully I have some leftover Gladware to do the job. A few of the Gladware containers are really handy if you craft a lot.

I’ll post up the wheel when I pull it tomorrow!

I got a 3D printer – a Prusa mini. It’s awesome.

I bring home a lot of maker toys, tools, etc, and usually if I make something useful first, it goes over better with the family. So this time, I needed something very useful, something I’d been grousing about for a while.

I chose my birdfeeder. I have a squirrel problem. More accurately, a chipmunk problem. The little guys scoot up the pole and empty the feeder. Because it’s on a shepherd’s crook-style pole, none of the squirrel baffles I’ve found would work. I needed an adaptor to put on the pole to support the baffle. I do have a very nice baffle, so there is that.

I tried a few CAD tools and settled on FreeCAD. It’s not terribly intuitive, but then neither is Illustrator, and I am darn good at that. So onto the learning. Many hours of tutorials later, I was able to design a part. It’s not terribly special or fancy, but it does mirror nicely (print two of the same thing and they interlock) and most importantly – supports my baffle.

The part was printed from Prusament PLA. I included recesses for 3mm screws and nuts (check that hex cutout!). I wrapped the pole with a piece of insulation from a bit of 12-2NMB wire for grip. I then drilled a PVC pipe cap for the pole diameter and added a large washer to keep the fixturing screws in place as defense against aggressive chipmunks. The PVC cap completely covers the PLA chunks, so it is harder for the little buggers to chew them up.

The whole thing works great, and now I am on to printing frogs and other goofy bits. Big project now is Miku headgear. That is taking a bit of time to design and sort out. This is a lot of fun and a great new thing to learn. Bring on the SpaceMouse!

A few people asked about this one, so here goes. More pics to come.

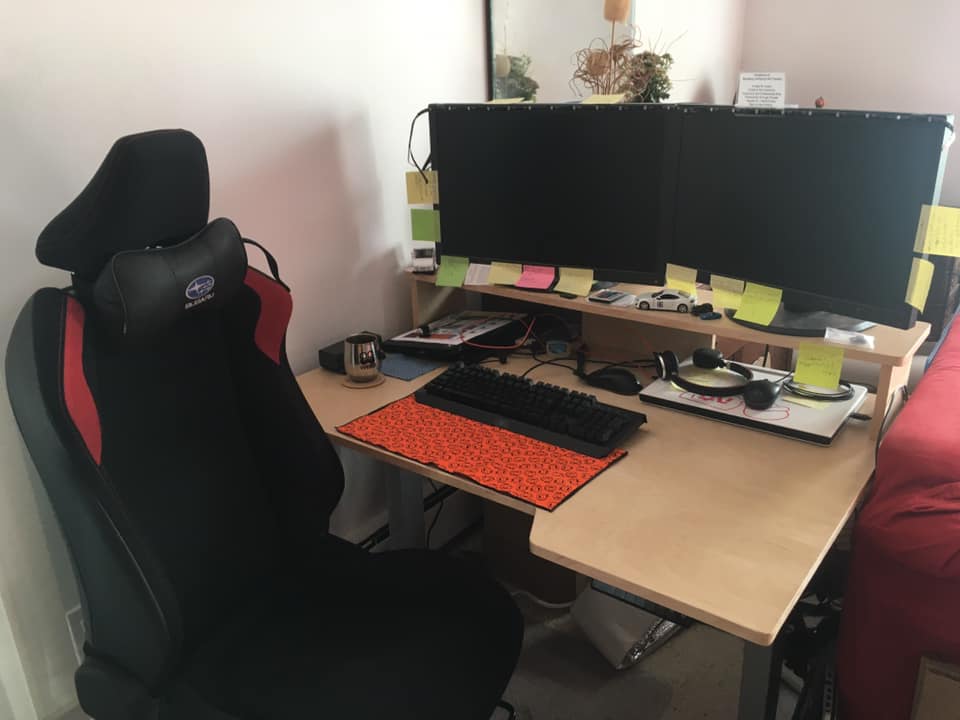
I picked up a pair of FRS seats a while ago and decided that as I actually had no real use for them, I would make a desk chair for my home office space. Combined with my new desk, this was a serious win.

New desk with FRS seat office chair

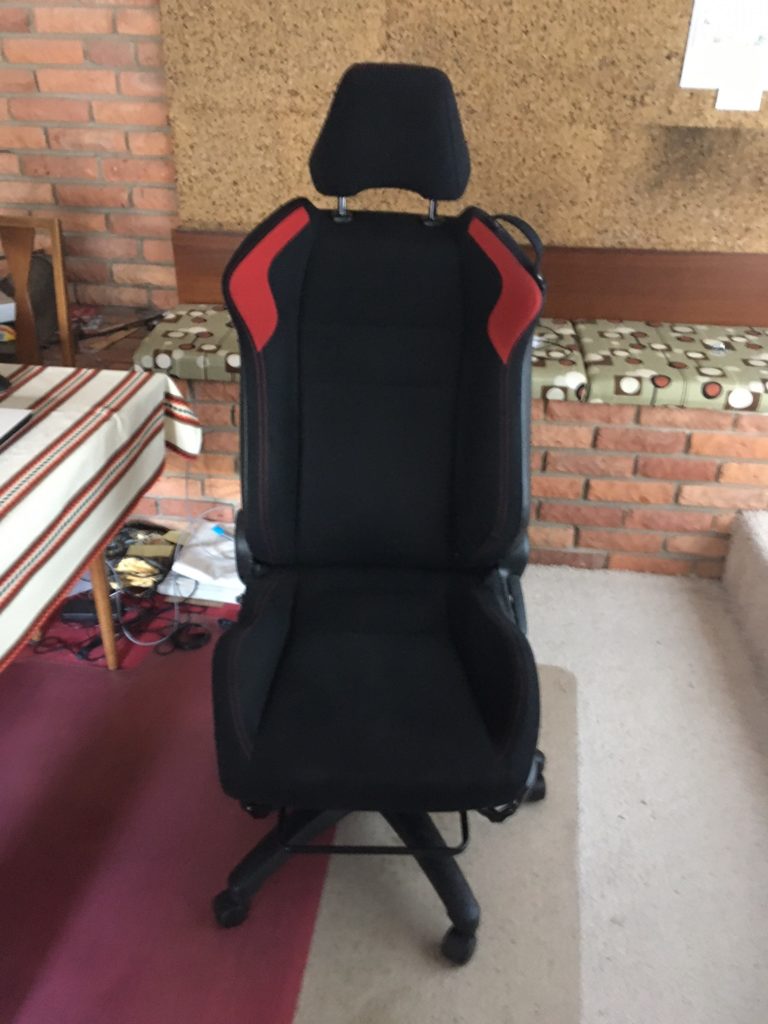
Materials included one 28″ desk chair base – https://www.amazon.com/Hihone-Replacement-Cylinder-Casters-Adjustable/dp/B08B7SVWCH is the one I used. You might need a shorter one, but I would not get a smaller diameter one. These seats are heavy, due to being automotive grade. I also used a 4′ section of steel L channel in 2″x1.5″. I cut this into two pieces that span the underside of the seat. I used 8 1-inch 1/4″ bolts, two 2-inch 1/4″ bolts, washers everywhere, and about 24 1/4″ nuts.

The biggest challenge with this project is getting the seat pitch correct. It’s a car seat from a sports car, so the seat base is pitched back qutie a bit. This does not work for an office chair. In addition, the seat mount on the seat base is also pitched back. To correct this, you have to suspend the front of the chair. (Pic coming soon)

Just the chair

If you use the seat rails (I did), you will have to drill one hole on each side to line up with the front holes in the chair mount. Take one of the pieces of L channel and mount it to the rear holes on the seat rails. Measure forward on the chair base to get the correct offset for the front mounting bar and drill the appropriate holes in the seat rails. Mount the other piece of L channel to those holes. Don’t tighten anything down hard yet.

The hole you drill

You can remove the seat rails and just mount the actual seat if you are on the shorter side, but at 5’6″, I did not have to do this. I still have some down-space on the gas shock, too.

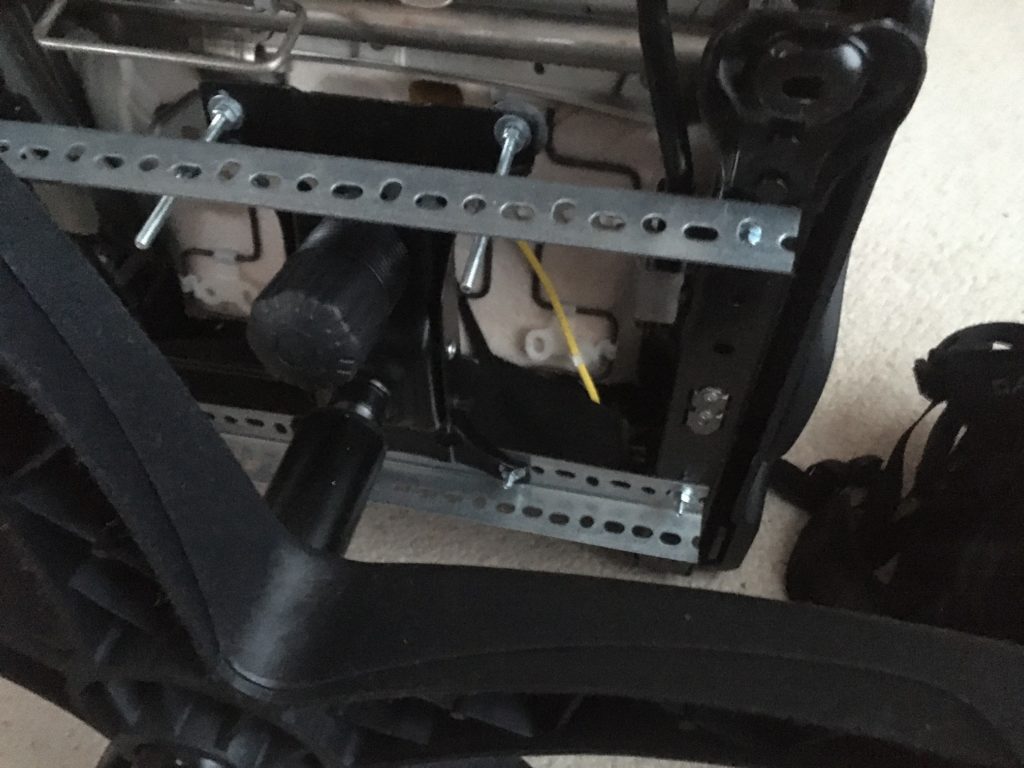
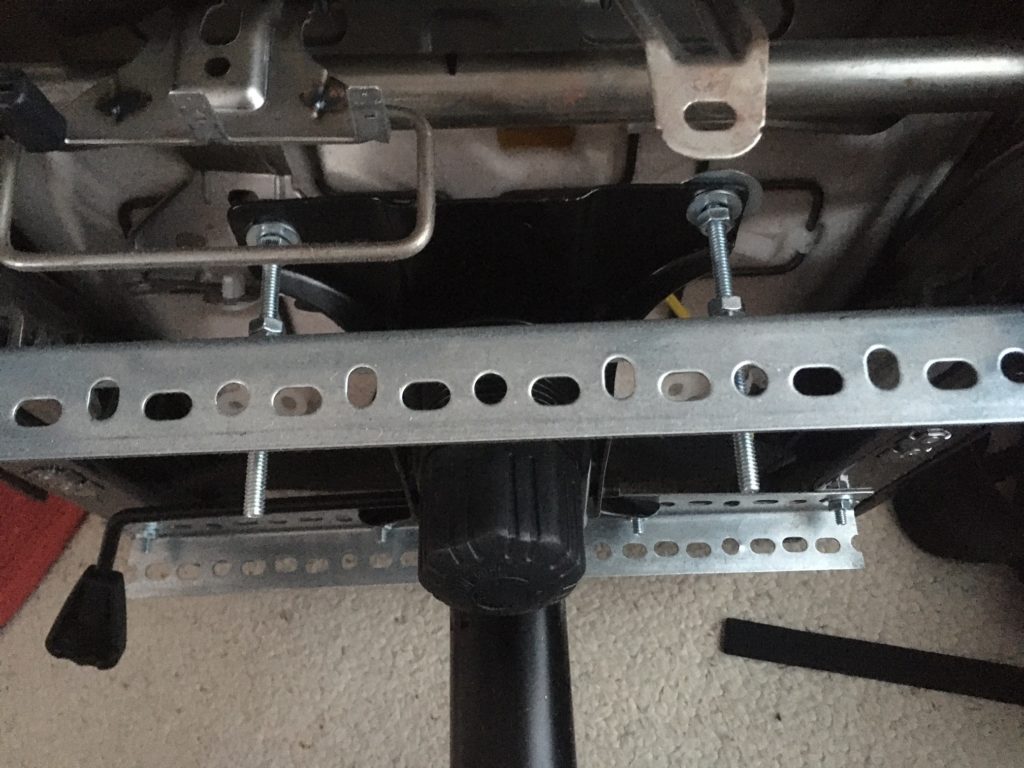
Now for the fun. Tip the seat over. I got a kitchen chair and put it upside-down on that to make it easier to work on. Take the chair mount off the chair base (it lifts off) and insert it under the front L channel, and over the rear L Channel. Bolt the back rail to the holes on the back side of the chair mount. Here is where it gets interesting – put the longer bolts into the front holes of the seat base and add washers and nuts Do not snug these up, they need to move around a bunch. There is enough flexibility in the steel to allow you to wiggle things around. I used 3″ bolts here, but 2″ or 2.5″ are more than enough and easier to work with. Add two more nuts and a washer and wiggle them into the front L channel. NOW, tighten them up at the chair base mount.

Better view of rear setup

At this point, you are ready to set your seat pitch. Add a washer and nut to the stubs of the long bolts sticking through the front L channel. Flip the whole mess over and get your level out. Adjust the height of the front of the seat so it is comfortable and then tighten everything up. Use the jam nuts (the double nuts on “top” of the front L channel) to hold the position.

Suspension adjustment for seat pitch

There you go. Enjoy your new desk chair. Mine is awesome!

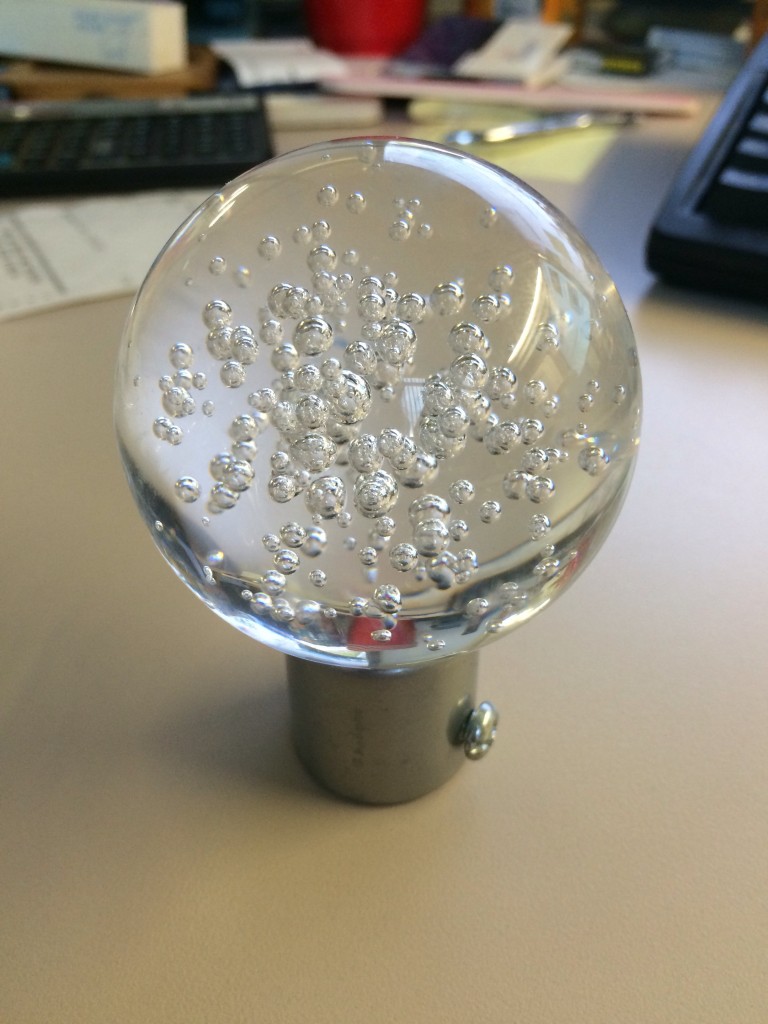
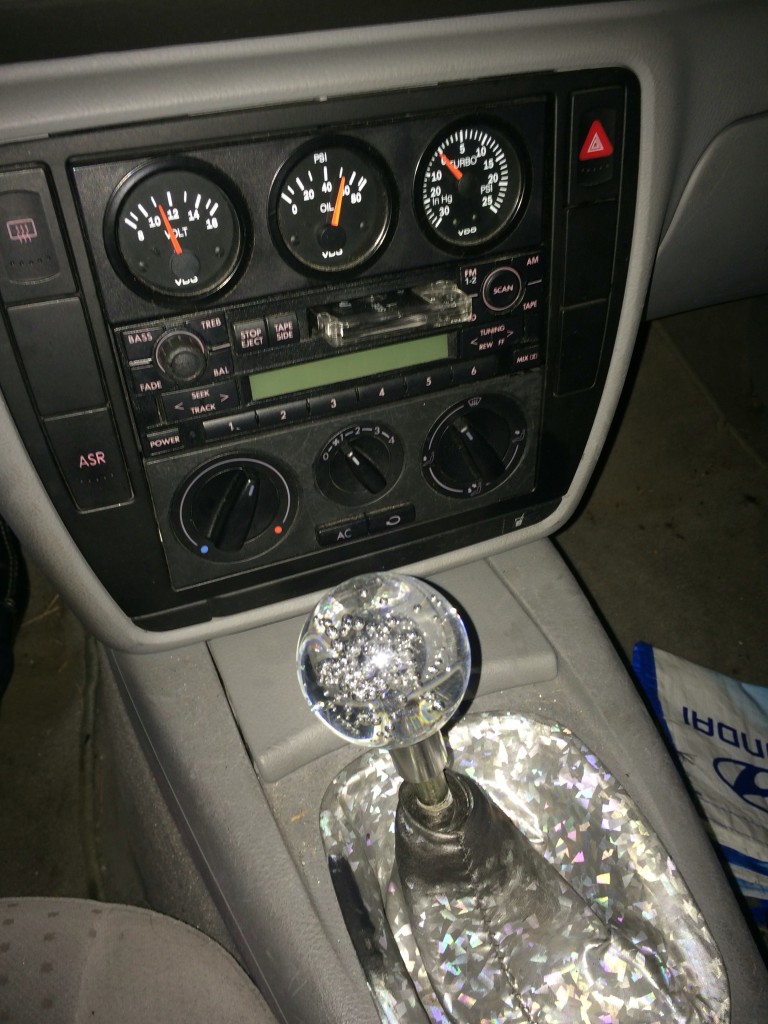
It’s an IKEA curtain rod end. I think it’s called Lystra. It was a joke, one of those April Fool’s things we used to do on ClubB5.com back in the day. This had to be back in like 2001-2. I remember taking pics on the AC Expressway. I had pulled the knob and found that the shifter shaft was hollow. Oh yes. The wheels were turning.

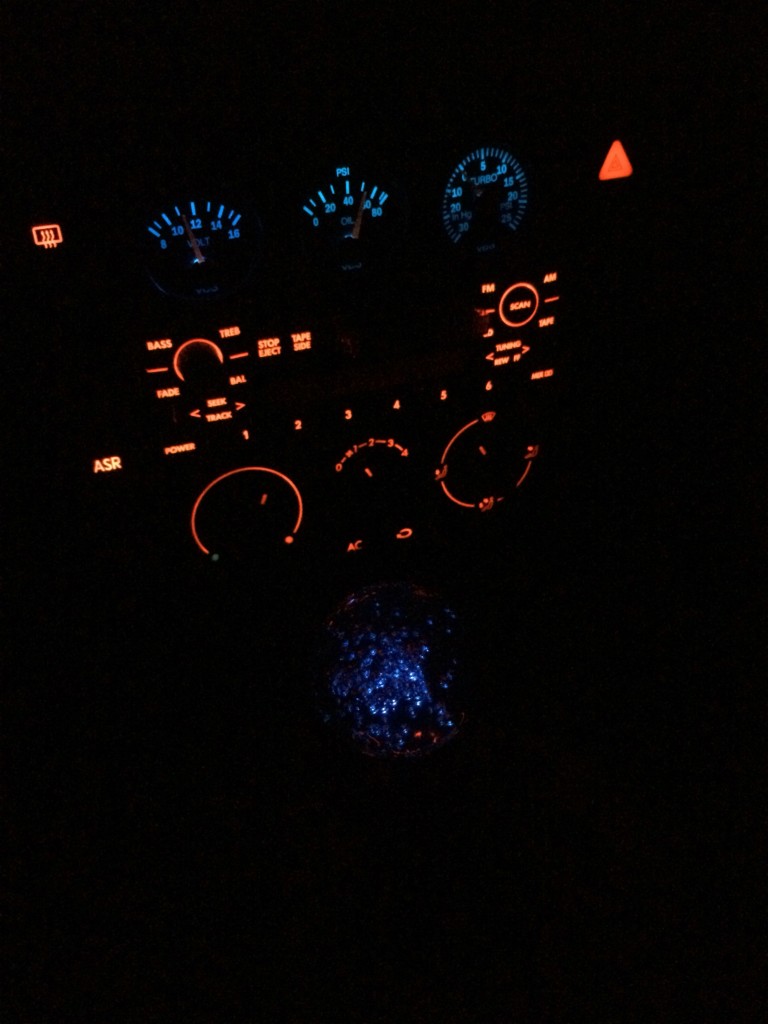
My dad machined the stainless base for me. It took a couple of tries to get it all right. Including the electronics. I blew a few LEDs getting it sorted, but eventually got it wired into the dash dimmer circuit, because that is what I do. It also took a while to find the correct color of LED, these are rather violet, not the traditional teal that was common back then.

Blue Bubble Ball

So if you ever want to blame someone for a Pep Boys mod, well, now you know. It was a joke. We had a laugh. I still put it on once in a while when I light up the roof. May as well enjoy the old beast, right?

OEM+

The pinnacle of early 2000s VW modding – poaching partsbin bits for upgrades. This is the OEM taxi dome light switch, wired into the dash dimmer and driving the fibre optic headliner off rail power. It’s my dream install and I am completely delighted. The switch arrived today thanks to a fellow B5er who reduced his hoard of parts by one switch.

There was a request to address the fibre optic headliner.

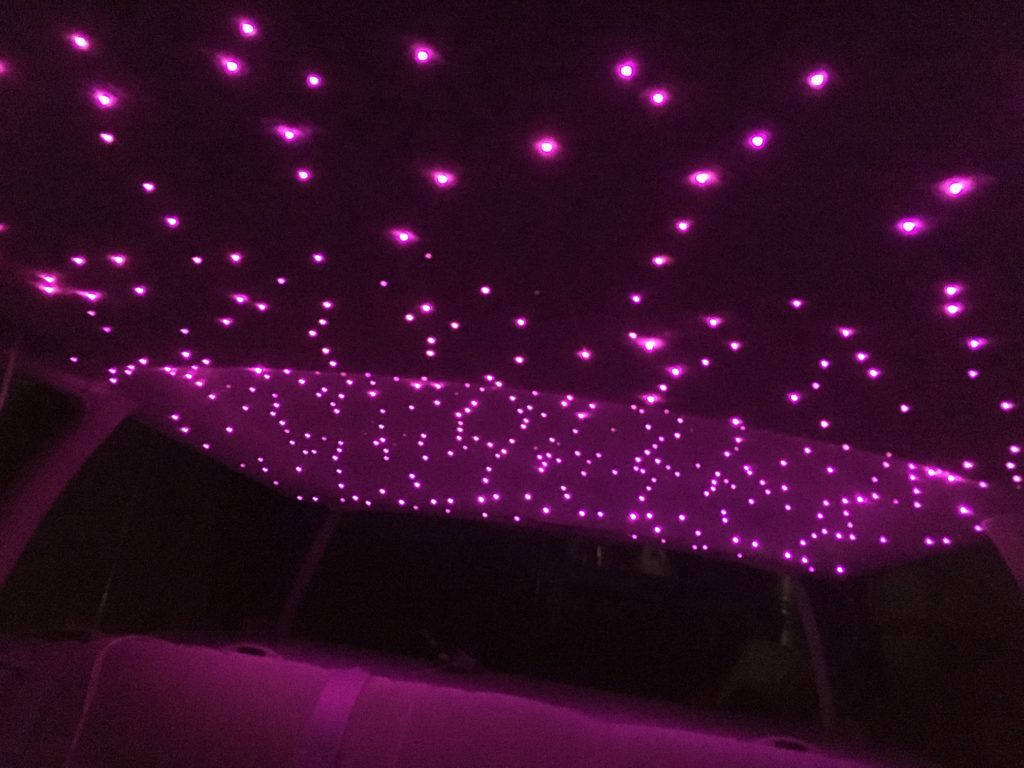
So. I redid the headliner in the B5. With custom-printed fabric from Contrando. I did a sticker bomb pattern of my girlie logo. It’s awesome.

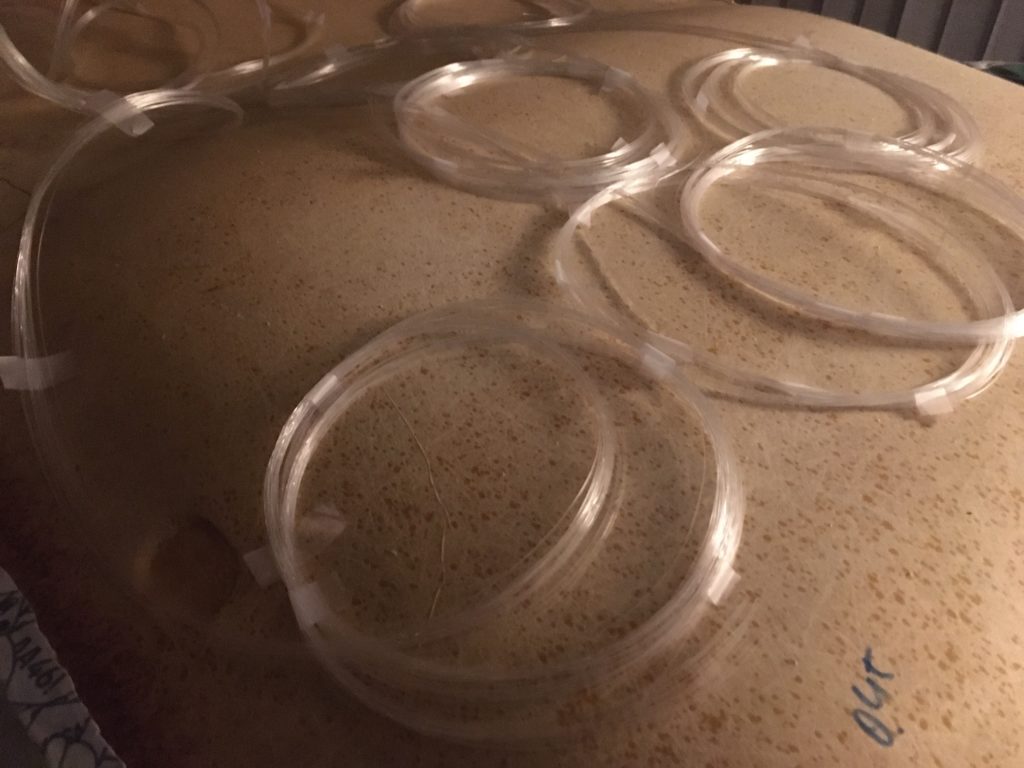
I purchased a 14W light engine from amazon Chinapost. It was $45 with 250 3m strands of roughly 1mm optical fibre. I also purchased an extra 100m of fibre.

I did the headliner like normal with lots of pattern matching so that the sunroof cover lines up when it is closed. This was not that hard. There was a lot of spray adhesive and high temp hot glue involved. See above.

Then… the fibres. There was much hemming and hawing about how to do the fibre insertion. I originally wanted to do a random pattern, but then realized that that would be pretty hard to accomplish with basically acres of headliner. So, I opted to put a fibre in each complete eyeball in the pattern. Basically light up pupils. The first 250 fibres took me about two weeks to get in. The next 250 took me another two weeks. The last hundred took me about a morning because I wanted that **** done.

The process I used was…

Poke a hole through the headliner in the desired location using an upholstery needle. This left a big enough hole that I could find it later, and almost big enough to get the fiber through. The headliner is a lot thicker than I realized, up to 1/2″ in places. Once I had all of the eyes located and poked through, then I started threading the fibre.

I did have to figure out where to stick the light engine as there is a sunroof in the car and that limits space a bit. I put it near the C pillar so it was easy to peek at if needed. All fibres ran to this location.

Threading the fibres required me to insert the needle and then catch the end of the fibre with it. Then push the fibre through allowing it to follow the needle. This was a lot of work and took me a bit to get a method down. Once I got it going, it was better. I needed a lot of ambient light to see the fibre ends. I ran the entire 250 fibre bundle first before moving to the next step. Then I cut the fibres and hot-glued them on the back side of the headliner. The hot glue melts at a temperature close to that of PMMA so I had to hold the fibres in position until the glue solidified a bit. This was about ten seconds.

I reserved all of the cut ends as they varied in length from 1 foot to about 8 feet. I reused all of these, finding the flat ends to face the light engine. Then, I started cutting into my coil of PMMA. In the end, I believe it was 618 individual fibres.

Once I had the fibres in, I had to equalize the lengths and get them into the coupler. This was difficult and I have no pics.

The last thing I did was glue down a piece of nylon fabric over the middle of it to protect the strands in the middle from the sunroof assembly. Again, no pic because doggone it, at that point, I wanted it done and in.

It is utterly amazing. I cannot describe how happy I am with it.

I found this oldie when replying to a BRZ thread. Original date was 15FEB2006.

I got the email from Volkswagen last evening: I would finally find out what my fast was about. I clicked in anticipation, who knows, maybe my fast would be special, maybe I would actually get a fast. Whatever, I was off for the e-ride.

My fast looked suspiciously similar to the fast I had already seen in the forums of TCL, but whatever. It was cute, if a little bit pudgy. Certainly more pudgy than the fast I have out in my garage, although it is certainly faster than the fast in my garage. That fast is not very fast, although it is very noisy and seems to think it can talk to me. I had the sneaking suspicion that my fast looked just like everyone else’s fast. Bummer.

I worked my way through the car configurator to see how fast I was going to go. I have to admit, the configurator was nicely done. Keeping tabs on the cost, advising when an option was part of a package, showing the parts on the vehicle, and good informational blurbs about each option. Very well done. I was particularly interested in the “joy ride” selection. I knew I was off for an e-ride, but an e-joyride? What the hell is that? I clicked. A clipped, European female voice advised me that the joyride would be handled by an expert driver on a closed course. It was right there that I went wrong. My wrongness would become readily apparent in mere moments.

At the words “expert driver on closed course” I made a critical error. My mind drifted. I let myself imagine who I would want my “expert driver” to be. I drifted further, would he be better looking than Schumi? More confident than Rubens? Would he be the racing equivalent of Fabio? I admit it – the sexy female voice told me I would get an expert driver. No crime in hoping for a good looking one. If I’m going to take a fantasy e-joyride with a guy, I want it to be nice, and good looks under the helmet will be a definite plus.

Then Helga popped up.

Uh, ok.

A porn star in a nurse’s uniform with a Cinnabon on her head is now on my screen. What does this have to do with joyriding? I have heels like that, I sure as hell don’t wear them when I’m racing. I don’t generally associate wearing them with driving at all. Little problem with ankle extension on the clutch foot, you see.

I want Hans, not Helga. And now she’s a cloying kitten, teasing the ******* in the rice rocket in the next lane over. This is embarrassing. Car chicks do not behave like that. We wear our clothes when we take your pink slip, thank you.

<detour>
It would not be possible to abuse Mitsubishi’s j-cool concept more heavily than the creative people did in this bit. Stereotype takes on new meaning after seeing that car. Yellow may be fast, and stickers may mean horsepower, but daaaaaayyy-um! That thing had it all! And the wigger that was driving it? Please! The Icy-Hot Stunnas could not have done a better job of creating that train wreck. Did I see diamonds on those teeth? Holy crap. If I wasn’t laughing out loud at Helga, I’m laughing out loud at this fool.
</detour>

So I watch while Helga drops the flags. The cars launch. Wait a minute, now she’s back in the car? Um, story board foul-up. It’s a bit hard to get around a launching vehicle and into the passenger seat if you are the starter. Wait, it’s supposed to be a fantasy e-joyride. I suppose anything can happen. It’s also a straight quarter, not exactly what I would do with a GTI – it’s supposed to be a You-Ro-Pee-N car with that fancy handling, right? What kind of handling is required for a straight quarter mile? More racing stereotypes leave me feeling cold.

With the rice rocket slain, Helga drops me off at the starting line and speeds off with those leg-breaking heels. I guess I’m supposed to be in some state of arousal at this point, but I am not. I am laughing. If humor was the point, I’m getting it. I am emailing this silly bit of teenage-boy marketing to my car-girlfriends so they can laugh at it, too. And they will. They will laugh and email it to their car-girlfriends, and so on. We will tell Helga jokes. Poor Helga. And we will snicker about this gorgeous GTI for a long time. We will probably not buy so many of them, because Volkswagen has told us where we stand in relation to it. We don’t.

You see, we’re not the target market. We’re girls.

TDIGate left behind a huge amount of work, noteably for the emmissions teams at the OEMs. These poor souls are tasked with tracking down cars that have been real-world driven for at least 30K miles, are unmodified, and preferably not raced, and then testing them to make sure no one was lying to the feds. Yikes. I got the letter in the mail detailing the current Subaru study of WRXs and BRZs and decided that as a former owner of not one, but two EPA non-compliant cars, I’d take one for the collective 86 team and see if my little blueberry could be of use. The offer included a late model loaner and a check for $350, so why not at least try?

In the case of Subaru’s BRZ and the WRX, finding suitable cars is a little more difficult than say, the case of the Chevy Sonic. When I dropped off my BRZ, the testing group was still trying to track down two unmodified and unraced WRXs, and were well outside of the usual hunting grounds of Metro Detroit in their search. I sneaked in with the requisite 30K and some creative answers to the phone screen which included questions such as:

Have you used the car to plow snow? No.
Have you towed with the car? No.
Have you street raced the car? If I did, I’m not saying anything.
Is the car modified (exhaust, tune, etc)? No. I promised not until the warranty expired.
Is the OEM cluster intact and unmodified? Yes.
Any new glass, paintwork, or other damage repaired in the last 90 days? No, but this is impressively crappy paint, even for three-wet.
Is the car equipped with the OEM tyres and wheels? Not at the moment, but it will be when I drop it off for you.

I drove my BRZ out to Boshart Auto Testing Services in Ann Arbor on a monday morning and met with their intake team. There was a more formal questionnaire that included much more detailed questions about racing which caused me some concern. I asked the intake tech about that, mentioning that I do HPDE and yes there are track stickers all over the car. He smiled and said “oh, skills improvement days! That is excellent! More people should do those.” I grinned and said, yup, lots of skills improvement days! He drives a boosted FiST and that is kind of cool in and of itself. He was amused that I was dragging a torque wrench and I explained I’d just put the stock wheels and tyres back on the night before and wanted to check after the drive out. No sense losing a wheel, right? We chatted about tyres (I am not happy or unhappy with the Falkens) and the process of transitioning from FF to FR. He noted that FF NA to FFT was a big deal for him – I was quite curious about that as the B5 is FFT and is actually quite a handful to drive if you are not ready for all of the boost. We laughed together about your car arriving in the next ZIP code before you do.

The tech handed over the keys to my loaner, and we also groaned about the automatic transmission. Really, Subaru. It’s a WRX and BRZ study. The two cars with the highest take rates of manual transmissions in the entire US. At least I avoided the dreaded CVT.

So, what exactly is EPA recert? EPA recert is a process where the OEM runs the target cars through the standard EPA testing protocols to see if there are any functional issues with the federally mandated emissions controls. It’s not that big of a deal, really. The cars are transferred to the OEM with chain of custody intact and strapped to the dyno. If parts have failed or are behaving uniquely, they will generally be taken for examination and replaced with new ones that, in theory, work properly. Typically, this would be the cat or possibly the ECU. Or who knows what, really. I would be ok woth it if they left the cat stuffing out… for science, of course. Once they are done, the car is washed, filled up, and returned to the owner with a list of any parts taken and the token check. Hopefully mine comes home with a report – I stuffed a folded Post-It note into the OBDII port requesting copies of any power pulls, pretty please.

Meanwhile, back at the ranch, I’m tooling around in a white automatic Legacy sedan rocking a manufacturer license plate. It’s nice, I guess? Actually, it’s a great example of a solid family sedan. It’s roomy, has good road presence, and it’s quiet. Coming from the BRZ, it’s also heavy AF and huge. I can feel the AWD working, which is weird and contributes to the ponderous driving dynamics. Overall grip is very good, and driving through a terribly heavy rainstorm was completely drama-free. I would not expect the same from the BRZ, although the BRZ would likely have been fun. And sideways. The halogen headlights are woefully inadequate, but coming from HIDs and LEDs, everything else is inadequate. There is no good reason for any OEM to continue with halogens. The MMI features Starlink and the CarPlay integration is excellent. Fuel tank is generous at 14 gallons, good for 500 miles to the tank driving moderately aggressively.

Would I buy a Legacy? Heck no. It’s completely outside of my Rspec. However, I think I would recommend one. It’s a very solid car and I do like the interior, which is dialed back and reserved.

I also consider myself lucky. I got a nice Subie. My coworker coughed up his Stelvio and got a Jeep for a loaner. I get that I wasn’t going to get a BRZ, but shouldn’t he have at least gotten an Alfa something or other? Really, FCA…

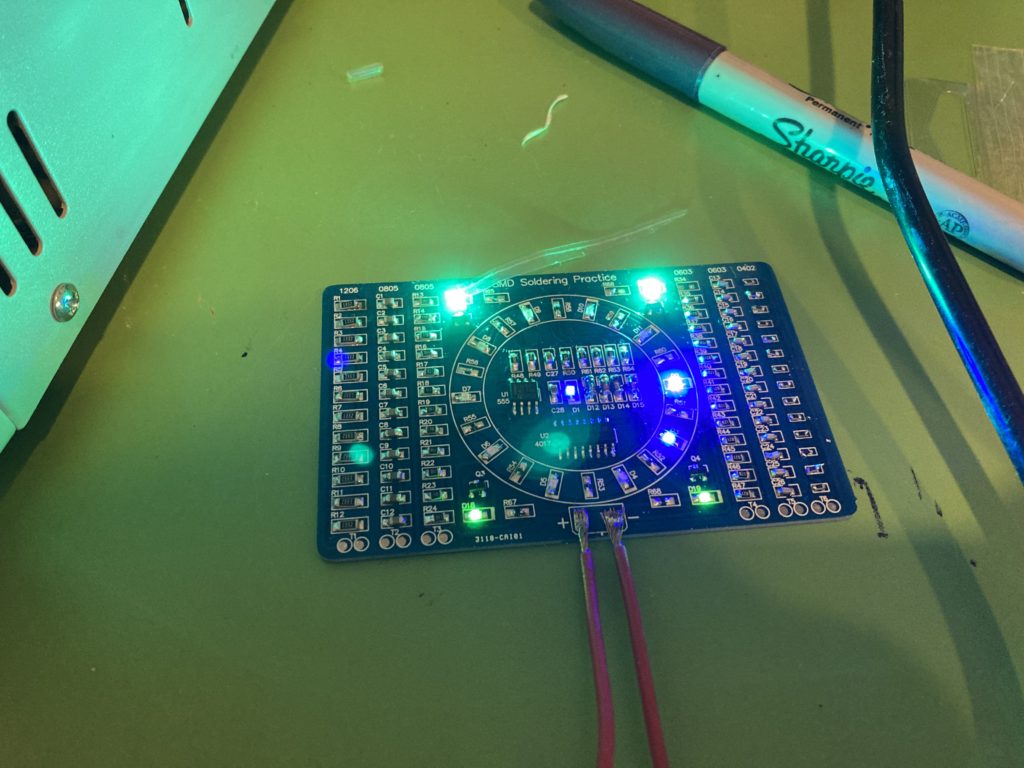
The BRZ has an accelerometer in the stock instrument cluster. It is only visible when the car is at a stop. This is the result of my day at GingerMan.

Not bad? Not sure if it goes higher than 1.0G yet. Have to keep working on that.

Monday was 100% up.

Headed out to GingerMan for a CGI track day. Paid an extra $50 for an instructor and requested a RWD person. Got a guy with a 600hp Corvette. We did the standard Novice run at my request, minus the classroom. 

Holy ****. I have CAR. 

The instructor (Mark) helped me find a functional line and had me pushing into oversteer in two useful locations on the track. The line is so incredibly different. We spent the whole day talking about the differences and why I was defaulting to certain (FF) behaviours. He actually drove the car for the first couple of laps and said that it is far better than he had imagined and continued to comment on how awesome it is the whole day. That was kind of cool. He said it was a big treat for him to have an experienced driver who knew all the basics and he could just focus on getting me around the track faster. That was really cool to hear.

His evaluation was – my inputs are great, super smooth, and very controlled, and my experience was clear. Once I had a new line down, I was holding it and driving very consistently. He said he could see me moving around a little to try things out. We are both DR people (there is one section of GM that can be run DA or DR) and he said that my path through there was really sweet and that basically from inside of 3 to through 11 I was kicking ass and only going to get faster. I still need to polish 1 and 2 and the entrance to 3. He said the biggest deal of all was that I was pushing into oversteer and not freaking out. I was not oversteering that much, but I guess it was enough to count. I was just countersteering it and riding it out for fun. Because of the placement of the line he recommended, I had plenty of track to use for that. So no stress. 

I ran my last session solo and railed it. 

Met a bunch of 86 people (five cars started, one lost their engine , one runs Midwest 86 Cup) and learned about AIM Solo telemetry. Might need one of those. 

So tons of positive feedback about my driving and met new people and had a blast and started to actually DRIVE my little blueberry.

So. One last note on the PP Brembos. I have way more brakes than I realized. Like OMGHolyCowWTFBBQ brakes. Like Last Stick Brakes. Hmmm. That would be a good name for a friction supplier.